Spring Web 模型-视图-控制器(MVC) 框架是围绕 DispatcherServlet而设计的,其支持可配置的 handler 映射,视图解析,本地化、时区和主题的解析以及文件上传的功能。DispatcherServlet 负责将请求分发到不同的 handler。默认的 handler 通过@Controller 和 @RequestMapping注解,提供多种灵活的处理方法。若加上 @PathVariable 注解和其他辅助功能,你也可用使用 @Controller 机制来创建 RESTful web 站点和应用程序。
使用 Spring Web MVC ,你不需要实现框架指定的任何接口或继承任意基类,就可以使用任意对象作为命令对象(或表单对象)。Spring 的数据绑定相当之灵活,比如,Spring可以将不匹配的类型作为应用可识别的验证错误,而不是系统错误,所以,你不需要去重复定义一套属性一致而类型是原始字符串的业务逻辑对象,去处理错误的提交或对字符串进行类型转换。反过来说就是,spring 允许你直接将正确类型的参数绑定到业务逻辑对象。
Spring 的视图解析也相当之灵活。完成一个请求,Controller 通常是负责准备一个数据模型 Map 和选择一个指定的视图,当然,也支持直接将数据写到响应流里。视图名称的解析是高度可配置的,可以通过文件扩展名、accept header 的 Content-Type、bean 的名称、属性文件或自定义的 ViewResolver 实现来解析。模型(Model,MVC 中的 M),是一个 Map 接口,提供对视图数据的完全抽象,可直接与渲染模版集成,如 JSP,Veloctiy,Freemarker;或直接生成原始数据,或xml、json等其他类型的响应内容。模型 Map 接口只是负责将数据转换为合适格式,如 jsp 请求属性,velocity 的 model 等。
Spring’s web module includes many unique web support features:
-
Clear separation of roles. Each role — controller, validator, command object,
form object, model object,
DispatcherServlet, handler mapping, view resolver, and so on — can be fulfilled by a specialized object. - Powerful and straightforward configuration of both framework and application classes as JavaBeans. This configuration capability includes easy referencing across contexts, such as from web controllers to business objects and validators.
- Adaptability, non-intrusiveness, and flexibility. Define any controller method signature you need, possibly using one of the parameter annotations (such as @RequestParam, @RequestHeader, @PathVariable, and more) for a given scenario.
- Reusable business code, no need for duplication. Use existing business objects as command or form objects instead of mirroring them to extend a particular framework base class.
- Customizable binding and validation. Type mismatches as application-level validation errors that keep the offending value, localized date and number binding, and so on instead of String-only form objects with manual parsing and conversion to business objects.
- Customizable handler mapping and view resolution. Handler mapping and view resolution strategies range from simple URL-based configuration, to sophisticated, purpose-built resolution strategies. Spring is more flexible than web MVC frameworks that mandate a particular technique.
-
Flexible model transfer. Model transfer with a name/value
Mapsupports easy integration with any view technology. - Customizable locale, time zone and theme resolution, support for JSPs with or without Spring tag library, support for JSTL, support for Velocity without the need for extra bridges, and so on.
- A simple yet powerful JSP tag library known as the Spring tag library that provides support for features such as data binding and themes. The custom tags allow for maximum flexibility in terms of markup code. For information on the tag library descriptor, see the appendix entitled Chapter 35, spring.tld
- A JSP form tag library, introduced in Spring 2.0, that makes writing forms in JSP pages much easier. For information on the tag library descriptor, see the appendix entitled Chapter 36, spring-form.tld
-
Beans whose lifecycle is scoped to the current HTTP request or HTTP
Session. This is not a specific feature of Spring MVC itself, but rather of theWebApplicationContextcontainer(s) that Spring MVC uses. These bean scopes are described in Section 5.5.4, “请求作用域、会话作用域和全局会话作用域”
Non-Spring MVC implementations are preferable for some projects. Many teams expect to leverage their existing investment in skills and tools, for example with JSF.
If you do not want to use Spring’s Web MVC, but intend to leverage other solutions that
Spring offers, you can integrate the web MVC framework of your choice with Spring
easily. Simply start up a Spring root application context through its
ContextLoaderListener, and access it through its ServletContext attribute (or
Spring’s respective helper method) from within any action object. No "plug-ins"
are involved, so no dedicated integration is necessary. From the web layer’s point of
view, you simply use Spring as a library, with the root application context instance as
the entry point.
Your registered beans and Spring’s services can be at your fingertips even without Spring’s Web MVC. Spring does not compete with other web frameworks in this scenario. It simply addresses the many areas that the pure web MVC frameworks do not, from bean configuration to data access and transaction handling. So you can enrich your application with a Spring middle tier and/or data access tier, even if you just want to use, for example, the transaction abstraction with JDBC or Hibernate.
像其他 web MVC 框架一样, Spring web MVC 框架也是基于请求驱动,围绕一个核心 Servlet 转发请求到对应的 Controller 而设计的,提供对web 程序开发的基础的支持。然而 Spring 的 DispatcherServlet 并不仅仅拥有这些,因为 Spring MVC 框架集成了 Spring IOC 容器,因此,Spring MVC 可以使用 Spring 提供的其他功能。
如图,展示了 Spring web MVC DispatcherServlet 处理请求的流程。
The request processing workflow of the Spring Web MVC DispatcherServlet is illustrated
in the following diagram. The pattern-savvy reader will recognize that the
DispatcherServlet is an expression of the "Front Controller" design pattern (this is a
pattern that Spring Web MVC shares with many other leading web frameworks).
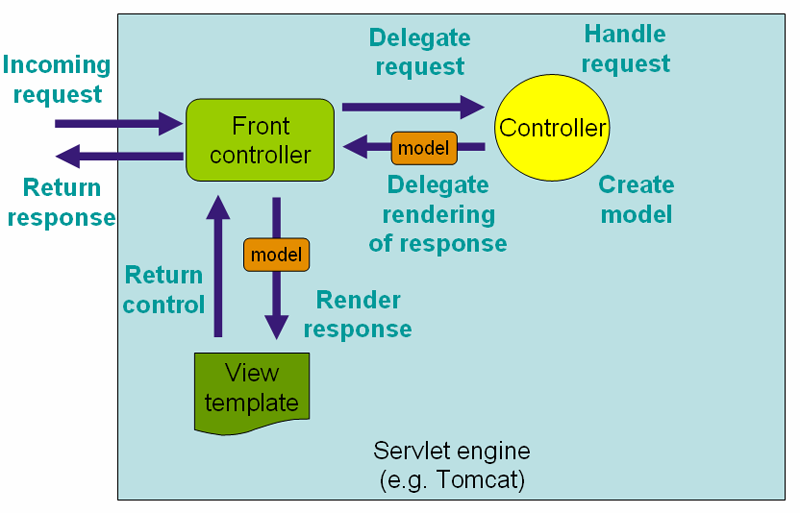
Spring Web MVC 请求处理的宏观图
DispatcherServlet 继承了 HttpServlet ,是一个真实的 Servlet,因此可以在 web.xml 文件声明。另外你需要使用 url 匹配元件指定 DispatcherServlet 处理的请求。如下例子,使用了标准 java EE Servlet 配置,配置了一个 DispatcherServlet的声明和匹配 url 元件:
<web-app>
    <servlet>
        <servlet-name>example</servlet-name>
        <servlet-class>org.springframework.web.servlet.DispatcherServlet</servlet-class>
        <load-on-startup>1</load-on-startup>
    </servlet>

    <servlet-mapping>
        <servlet-name>example</servlet-name>
        <url-pattern>/example/*</url-pattern>
    </servlet-mapping>

</web-app>
在刚才配置的例子中,所有以 /example 开始的请求都会被名为 example 的 DispatcherServlet 所处理。在 Servlet 3.0+ 环境,也可以以编程方式配置上述 DispatcherServlet。如下代码与上述 web.xml 配置例子等效:
public class MyWebApplicationInitializer implements WebApplicationInitializer {

    @Override
    public void onStartup(ServletContext container) {
        ServletRegistration.Dynamic registration = container.addServlet("dispatcher", new DispatcherServlet());
        registration.setLoadOnStartup(1);
        registration.addMapping("/example/*");
    }

}
Spring MVC 提供的 WebApplicationInitializer 接口,可以确保检测到基于代码的配置和用来自动初始化基于 Servlet 3 的容器。它有一个抽象的实现类 AbstractDispatcherServletInitializer,简化了DispatcherServlet 的注册,只需指定 servlet mapping 就可以了,详情请参考 Code-based Servlet container initialization。
上述的操作仅仅是开启了 Spring Web MVC 之旅的第一步,现在你需要配置 Spring Web MVC 所使用到的各种 bean(这不在本节讨论范围)。
如 Section 5.15, “ApplicationContext 的附加功能” 所描述那样,在Spring里可以获取到 ApplicationContext 实例。在 web MVC 框架,每一个 DispatcherServlet 都拥有自己的 WebApplicationContext,这个 WebApplicationContext 继承了根 WebApplicationContext 定义的所有 bean.
As detailed in Section 5.15, “ApplicationContext 的附加功能”, ApplicationContext instances in Spring can be
scoped. In the Web MVC framework, each DispatcherServlet has its own
WebApplicationContext, which inherits all the beans already defined in the root
WebApplicationContext. These inherited beans can be overridden in the servlet-specific
scope, and you can define new scope-specific beans local to a given Servlet instance.
- Spring Web MVC 上下文的层次结构 image::images/mvc-contexts.gif[width=400]
DispatcherServlet 在初始化时,Spring MVC 会查找 web 应用 WEB_INF 目录下的[servlet-name]-servlet.xml 并创建在此文件定义的 bean,若在全局范围里有一个名称相同的 bean,全局范围的 bean 会被覆盖掉。
假设DispatcherServlet Servlet 的配置如下(在 web.xml 配置):
<web-app>
    <servlet>
        <servlet-name>golfing</servlet-name>
        <servlet-class>org.springframework.web.servlet.DispatcherServlet</servlet-class>
        <load-on-startup>1</load-on-startup>
    </servlet>
    <servlet-mapping>
        <servlet-name>golfing</servlet-name>
        <url-pattern>/golfing/*</url-pattern>
    </servlet-mapping>
</web-app>
上述配置,要求应用程序在 WEB-INF 目录下有一个 golfing-servlet.xml 文件,在这个文件里,会包含 Spring MVC 的所有组件(beans)。你可以通过定义 servlet 初始化参数来改变[servlet-name]-servlet.xml 文件的路径,如下:
<web-app>
    <context-param>
        <param-name>contextConfigLocation</param-name>
        <param-value>/WEB-INF/root-context.xml</param-value>
    </context-param>
    <servlet>
        <servlet-name>dispatcher</servlet-name>
        <servlet-class>org.springframework.web.servlet.DispatcherServlet</servlet-class>
        <init-param>
            <param-name>contextConfigLocation</param-name>
            <param-value></param-value>
        </init-param>
        <load-on-startup>1</load-on-startup>
    </servlet>
    <servlet-mapping>
        <servlet-name>dispatcher</servlet-name>
        <url-pattern>/*</url-pattern>
    </servlet-mapping>
    <listener>
        <listener-class>org.springframework.web.context.ContextLoaderListener</listener-class>
    </listener>
</web-app>
WebApplicationContext 扩展了 ApplicationContext,额外提供了 web 程序所需要的功能。与传统 ApplicationContext 不同的是,WebApplicationContext 支持主题解析(查看 Section 16.9, “主题的使用”),并且知道其所关联的的 Servlet(通过一个指向 ServletContext 的引用)。WebApplicationContext 绑定在 ServletContext 里,在需要访问的时候,可以使用 RequestContextUtils 提供的静态方法获取 WebApplicationContext。
DispatcherServlet 使用了其专用的 bean 来处理请求和渲染视图。这些 bean 是 Spring 的组成部分之一,你可以选择在 WebApplicationContext配置所使用一个或多个专用的bean。当然,比并不需要一开始就去配置这些专用的 bean,因为在你不配置这些 bean时,Spring 会维护一系列默认的 bean。首先我们看一下 DispatcherServlet 依赖了哪些专用的 bean,后续再作详解。
Table 16.1. WebApplicationContext 专用 bean 列表
| Bean 类型 | 解释 |
|---|---|
将传入的请求映射到处理器,与一系列基于各种条件的 pre- 和 post- 处理器,这些处理器根据 | |
HandlerAdapter | 帮助 |
将异常映射到指定视图,也支持自定义更加复杂的异常处理流程 | |
将合理的视图名称解释为真实的视图类型 | |
解释客户端所在地区和其时区(本地化),以便提供国际化的视图 | |
解释 web 程序可用的主题,比如,提供个性化的布局 | |
解释 multi-part 请求,比如,在 html form 里支持文件上传 | |
Stores and retrieves the "input" and the "output" |
如上一节所说,每一个 DispatcherServlet 都维持了一系列默认的实现。这些默认实现的信息保存在 org.springframework.web.servlet 包里的 DispatcherServlet.properties 文件。
尽管所有专用的 bean 都有其合理的默认值。迟早你也需要根据实际去自定义这些 bean 的中一个或多个属性值。例如一种很常见的自定义应用,配置一个 InternalResourceViewResolver,其 prefix 为视图文件的父文件夹。
不管这些默认细节如何实现,在这里都需要清楚一个概念——一旦在 WebApplicationContext 配置自己专用的 bean,就有效覆盖了原有一系列默认的实现,至少也会作为这个专用 bean 的一个实例。比如,配置了 InternalResourceViewResolver,默认的一系列 ViewResolver 实现都会被覆盖。
在 Section 16.16, “Configuring Spring MVC” 章节,你可以知道 Spring MVC 的其他配置选项,包括 MVC java 配置和 MVC XML 的命名空间。不管你选择如何去配置应用,这一节解释的理念基本都可以帮到你。
In Section 16.16, “Configuring Spring MVC” you’ll learn about other options for configuring Spring MVC including MVC Java config and the MVC XML namespace both of which provide a simple starting point and assume little knowledge of how Spring MVC works. Regardless of how you choose to configure your application, the concepts explained in this section are fundamental should be of help to you.
在你建立一个 DispatcherServlet 之后,并处理一个传进来的请求时,DispatcherServlet 会按照以下顺序年来处理这个请求:
-
寻找
WebApplicationContext,并将WebApplicationContext作为一个属性绑定到请求里,以便控制器或其他原件在后续中使用。默认会以DispatcherServlet.WEB_APPLICATION_CONTEXT_ATTRIBUTE键绑定到请求里。 - 将本地化解析器绑定到请求里,以便在处理这个请求时,原件可以解析到客户端的地区(为了渲染视图,准备日期等)。如果你不需要本地化解析器,可以忽略这个步骤。
- 将主题解析其绑定到请求里,让原件(如视图)决定去使用哪一种主题。如果你不需要使用主题,可以忽略这个步骤。
-
如果你指定一个 multipart file 解析器,会检查这个请求包含 multiparts 请求。当发现了 multiparts,这个请求会被封装为
MultipartHttpServletRequest对象,提供给后续原件处理。详细信息,清参考 Section 16.10, “Spring’s multipart (文件上传) 支持”。 - 寻找合适的 handler。如何找到这个 handler,执行与这个 handler 关联的执行链,目的是准备一个 model 或 渲染。
- 如果返回一个 model,渲染相对应的视图。反之(可能是因为 pre- 或 post- 处理器拦截了这个请求,也可能是权限问题),便不渲染任何视图,因为这个请求可能已执行完成。
handler 异常解析是在 WebApplicationContext 声明的,接收在上述处理过程抛出的异常。使用异常解析器,你可以根据异常信息自定义其处理方式。
DispatcherServlet 也支持返回 last-modification-date( 在 Servlet API 里有相应的接口)。让指定请求返回 last-modification-date 的处理方式非常简单:DispatcherServlet 寻找是否有匹配的 handler,并检查这个 handler 是否实现了 LastModified接口,如果实现了该接口,方法long getLastModified(request) 的返回值会返回到客户端。
你可以通过在 web.xml 里设置 Servlet 的初始化参数,来自定义一个 DispatcherServlet 实例。下表列出了 DispatcherServlet 支持的参数:
Table 16.2. DispatcherServlet initialization parameters
| 参数 | 说明 |
|---|---|
|
|
| 传给 上下文( |
|
|
Controllers provide access to the application behavior that you typically define through a service interface. Controllers interpret user input and transform it into a model that is represented to the user by the view. Spring implements a controller in a very abstract way, which enables you to create a wide variety of controllers.
Spring 2.5 introduced an annotation-based programming model for MVC controllers that
uses annotations such as @RequestMapping, @RequestParam, @ModelAttribute, and so
on. This annotation support is available for both Servlet MVC and Portlet MVC.
Controllers implemented in this style do not have to extend specific base classes or
implement specific interfaces. Furthermore, they do not usually have direct dependencies
on Servlet or Portlet APIs, although you can easily configure access to Servlet or
Portlet facilities.
![[Tip]](images/tip.png) | Tip |
|---|---|
|
在 spring-projects Org on Github 上,有好几个项目都使用这一节谈到的注解,有MvcShowcase, MvcAjax, MvcBasic, PetClinic, PetCare等…… |
@Controller
public class HelloWorldController {

    @RequestMapping("/helloWorld")
    public String helloWorld(Model model) {
        model.addAttribute("message", "Hello World!");
        return "helloWorld";
    }
}
如你所见,@Controller 和 @RequestMapping 允许灵活的配置方法签名。在上述例子中,helloWorld 方法接受一个 Model 参数,并返回一个视图名称,当然也允许添加方法入参和返回不同类型的值,这些内容将会在后面解释。@Controller 、@RequestMapping 和其他一些功能注解组成了 Spring MVC 实现的基础,这一节将会谈到这些组成的注解和在 Servlet 环境的普遍用法。
@Controller 表明了被注解类的服务角色——控制器。Spring 不需要去继承任何 Controller 的基类或引用任意的 Servlet API。当然了,如何你需要的, 你仍然可以引用 Servlet API。
@Controller 注解定义了被注解类的原型,表明了注解类的服务角色。dispatcher 会扫描这些被 @Controller 标记的类并检测 @RequestMapping 标记的方法(见下一节)。
你可以在 dispatcher 上下文显式定义控制器 bean,不过,为了与 Spring 支持在类路径上检测 bean 并自动注册这些 bean 定义 保持一致,@Controller 也许允许自动检测。
要开启注解控制器的扫描功能,需要在你的配置里添加组件扫描元件。如下 xml 所示,可以使用 spring-context 模式开启此扫描功能:
<?xml version="1.0" encoding="UTF-8"?>
<beans xmlns="http://www.springframework.org/schema/beans"
    xmlns:xsi="http://www.w3.org/2001/XMLSchema-instance"
    xmlns:p="http://www.springframework.org/schema/p"
    xmlns:context="http://www.springframework.org/schema/context"
    xsi:schemaLocation="
        http://www.springframework.org/schema/beans
        http://www.springframework.org/schema/beans/spring-beans.xsd
        http://www.springframework.org/schema/context
        http://www.springframework.org/schema/context/spring-context.xsd">

    <context:component-scan base-package="org.springframework.samples.petclinic.web"/>

    <!-- ... -->

</beans>
你可以在类或指定 handler 方法上,使用 @RequestMapping 注解来映射 URL,如 /appointments。
You use the @RequestMapping annotation to map URLs such as /appointments onto an
entire class or a particular handler method. Typically the class-level annotation maps a
specific request path (or path pattern) onto a form controller, with additional
method-level annotations narrowing the primary mapping for a specific HTTP method
request method ("GET", "POST", etc.) or an HTTP request parameter condition.
如下例子来自于 Petcare 项目,展示了如何使用 @RequestMapping 注解。
@Controller
@RequestMapping("/appointments")
public class AppointmentsController {

    private final AppointmentBook appointmentBook;

    @Autowired
    public AppointmentsController(AppointmentBook appointmentBook) {
        this.appointmentBook = appointmentBook;
    }

    @RequestMapping(method = RequestMethod.GET)
    public Map<String, Appointment> get() {
        return appointmentBook.getAppointmentsForToday();
    }

    @RequestMapping(value="/{day}", method = RequestMethod.GET)
    public Map<String, Appointment> getForDay(@PathVariable @DateTimeFormat(iso=ISO.DATE) Date day, Model model) {
        return appointmentBook.getAppointmentsForDay(day);
    }

    @RequestMapping(value="/new", method = RequestMethod.GET)
    public AppointmentForm getNewForm() {
        return new AppointmentForm();
    }

    @RequestMapping(method = RequestMethod.POST)
    public String add(@Valid AppointmentForm appointment, BindingResult result) {
        if (result.hasErrors()) {
            return "appointments/new";
        }
        appointmentBook.addAppointment(appointment);
        return "redirect:/appointments";
    }
}
例子中,在多处地方使用 @RequestMapping。第一个用在了类上,表示@RequestMapping 这个控制器下的所有 handler 方法都是相对 /appointments 路径而言的。get() 方法对 @RequestMapping 做了进一步的细化 —— 此方法只接收 GET 请求方式,换句话说就是 /appointments 的GET 请求会调用这个方法; add() 方法也做一个类似的细化; getNewForm() 方法在 RequestMapping 上组合定义了 http 方法和路径,因此此方法会处理 appointments/new 的 GET 请求。
getForDay() 方法演示了 @RequestMapping 的另外一种使用方式 —— URI 模版(查看 the next section)。
在类上添加 @RequestMapping 不是必须的,如果没有,所有的路径都是绝对路径,而不是相对路径。来自 PetClinic 项目的例子展示如何使用 @RequestMapping 来定义一个 multi-action 控制器:
@Controller
public class ClinicController {

    private final Clinic clinic;

    @Autowired
    public ClinicController(Clinic clinic) {
        this.clinic = clinic;
    }

    @RequestMapping("/")
    public void welcomeHandler() {
    }

    @RequestMapping("/vets")
    public ModelMap vetsHandler() {
        return new ModelMap(this.clinic.getVets());
    }

}
上面的例子没有指定 GET、PUT、POST 等方法,因为 @RequestMapping 默认匹配所有的 http 方法。使用 @RequestMapping(method=GET) 可以缩小其映射范围。
某些时候,控制器需要在运行时 AOP 代理修饰一番。
In some cases a controller may need to be decorated with an AOP proxy at runtime.
One example is if you choose to have @Transactional annotations directly on the
controller. When this is the case, for controllers specifically, we recommend
using class-based proxying. This is typically the default choice with controllers.
However if a controller must implement an interface that is not a Spring Context
callback (e.g. InitializingBean, *Aware, etc), you may need to explicitly
configure class-based proxying. For example with <tx:annotation-driven />,
change to <tx:annotation-driven proxy-target-class="true" />.
Spring 3.1 introduced a new set of support classes for @RequestMapping methods called
RequestMappingHandlerMapping and RequestMappingHandlerAdapter respectively. They are
recommended for use and even required to take advantage of new features in Spring MVC
3.1 and going forward. The new support classes are enabled by default by the MVC
namespace and the MVC Java config but must be configured explicitly if using neither.
This section describes a few important differences between the old and the new support
classes.
Prior to Spring 3.1, type and method-level request mappings were examined in two
separate stages — a controller was selected first by the
DefaultAnnotationHandlerMapping and the actual method to invoke was narrowed down
second by the AnnotationMethodHandlerAdapter.
With the new support classes in Spring 3.1, the RequestMappingHandlerMapping is the
only place where a decision is made about which method should process the request. Think
of controller methods as a collection of unique endpoints with mappings for each method
derived from type and method-level @RequestMapping information.
This enables some new possibilities. For once a HandlerInterceptor or a
HandlerExceptionResolver can now expect the Object-based handler to be a
HandlerMethod, which allows them to examine the exact method, its parameters and
associated annotations. The processing for a URL no longer needs to be split across
different controllers.
There are also several things no longer possible:
-
Select a controller first with a
SimpleUrlHandlerMappingorBeanNameUrlHandlerMappingand then narrow the method based on@RequestMappingannotations. -
Rely on method names as a fall-back mechanism to disambiguate between two
@RequestMappingmethods that don’t have an explicit path mapping URL path but otherwise match equally, e.g. by HTTP method. In the new support classes@RequestMappingmethods have to be mapped uniquely. - Have a single default method (without an explicit path mapping) with which requests are processed if no other controller method matches more concretely. In the new support classes if a matching method is not found a 404 error is raised.
The above features are still supported with the existing support classes. However to take advantage of new Spring MVC 3.1 features you’ll need to use the new support classes.
URI 模版能便捷访问 @RequestMapping 方法中 URL 的某些部分。
URI 模版是一个类似于 URI 的字符串,其中包含了一个或多个变量。当你将这些变量替换掉市,就变回了 URI。 URI 模版格式 proposed RFC 定义了如何参数化 URI。比如,URI 模版 http://www.example.com/users/{userId},包含了变量 userId,设置此变量为 __fred,就会变成http://www.example.com/users/fred。
可在方法入参上使用注解 @PathVariable 绑定 URI 的模版参数:
@RequestMapping(value="/owners/{ownerId}", method=RequestMethod.GET)
public String findOwner(@PathVariable String ownerId, Model model) {
    Owner owner = ownerService.findOwner(ownerId);
    model.addAttribute("owner", owner);
    return "displayOwner";
}
URI 模版 " /owners/{ownerId}" 指定了参数 owernId。当控制器处理这个请求时,会将 URI 中匹配的部分赋值给 owernId 变量。如,当传入 /owners/fred 请求时,owernId 的值就是 fred。
[提示]
在处理 @PathVariable 注解时,Srping MVC 是根据名称来匹配 URI 模版变量的。你可以在注解里指定这个名称:
@RequestMapping(value="/owners/{ownerId}", method=RequestMethod.GET)
public String findOwner(@PathVariable("ownerId") String theOwner, Model model) {
    // implementation omitted
}
如果URI 模版变量名和入参名一致,可以省略这个细节。只要你的代码不是不带调试信息的编译,Spring MVC 将匹配入参名和 URI 变量名。
@RequestMapping(value="/owners/{ownerId}", method=RequestMethod.GET)
public String findOwner(@PathVariable String ownerId, Model model) {
    // implementation omitted
}
一个方法可以有任意个 @PathVariable 注解。
@RequestMapping(value="/owners/{ownerId}/pets/{petId}", method=RequestMethod.GET)
public String findPet(@PathVariable String ownerId, @PathVariable String petId, Model model) {
    Owner owner = ownerService.findOwner(ownerId);
    Pet pet = owner.getPet(petId);
    model.addAttribute("pet", pet);
    return "displayPet";
}
当在 Map<String, String> 参数使用 @PathVariable 注解时,map 会填充所有 URI 模版变量。
URI 模版可以组合类型和参数路径的 @RequestMapping。因此,findPet 可以处理类似 /owners/42/pets/21 的URI 。
@Controller
@RequestMapping("/owners/{ownerId}")
public class RelativePathUriTemplateController {

    @RequestMapping("/pets/{petId}")
    public void findPet(@PathVariable String ownerId, @PathVariable String petId, Model model) {
        // implementation omitted
    }

}
@PathVariable 参数可以是任意的简单类型(如 int,long,Date 等),Spring 会自动将其进行类型转换,转换出错会抛出 TypeMismatchException。你可以注册支持解析其他数据类型,详情请看 the section called “方法参数和类型转换” 和 the section called “自定义 WebDataBinder 的初始化”.
偶尔,在URI 模版变量里,你会需要用到更加精确的控制。比如 "/spring-web/spring-web-3.0.5.jar" 这样的URI,该如何拆分成多个部分?
@RequestMapping 注解支持在 URI 模版变量里使用正则表达式。语法 {变量名:正则表达式},第一个部分定义变量的名称,第二部分是正则表达式。如
@RequestMapping("/spring-web/{symbolicName:[a-z-]}-{version:\\d\\.\\d\\.\\d}{extension:\\.[a-z]}")
    public void handle(@PathVariable String version, @PathVariable String extension) {
        // ...
    }
}
@RequestMapping 注解处理支持 URI 模版,也支持使用 Ant 风格模式(如:/myPath/*.do)。同时支持组合使用 URI 模版和 Ant 风格模式(如:e.g. `/owners/*/pets/{petId})。
当一个 URL 与多个模式匹配时,会设法找出最具体的那一个路径。
当模式中的 URI 模版变量和通配符的数量相对较少,会认为其相对具体。如:/hotels/{hotel}/* 相对 /hotels/{hotel}/** 更加合适,因为 /hotels/{hotel}/* 只有一个URI 模版变量和一个通配符,而 hotels/{hotel}/**` 有一个 URI 模版变量和两个通配符。
当两个模式中的 URI 模版变量和通配符数量相同时,更详细的那一个会认为相对适合。如 /foo/bar* 比 /foo/* 更为详细。
当两个模式中变量个数详细程度相同时,使用更少通配符的那一个会相对具体。如 /hotels/{hotel} 比 /hotels/{hotel} 更加具体。
一些额外的特别规定:
-
任意模式都比默认全匹配
/**模式具体。如:/api/{a}/{b}/{c}比/**更加具体。 -
任意不包含两个通配符的模式都比前缀模式(如
/public/**) 更加具体。/public/path3/{a}/{b}/{c}比/public/**更加具体。
For the full details see AntPatternComparator in AntPathMatcher. Note that the PathMatcher
can be customized (see Section 16.16.9, “Path Matching” in the section on configuring Spring MVC).
全部细节信息可查看 AntPathMatcher 的 AntPatternComparator。注意,PathMatcher 是可以自定义的。(可查看 Section 16.16.9, “Path Matching” 的 Spring MVC 配置)
在 @RequestMapping 注解中,模式支持使用占位符来代替本地属性 和/或者 系统属性和环境变量。当路径需要通过配置文件来自定义时,适合使用占位符。占位符的详细信息,可以查看 PropertyPlaceholderConfigurer 的 javadoc。
Spring MVC 默认自动执行 ".*" 的后缀匹配,所以当一个控制器匹配 /person 时,其也隐式匹配 /person.*。这样的设计允许通过文件扩展名来说明内容的类型名比如 /person.pdf,
/person.xml 等。然而,这里会有一个常犯的陷阱,当路径最后的片段是 URI 模版变量时(如 /person/{id}),请求 /person/1.json 可以正确匹配路径,变量 id=1,拓展名为 json,可当 id 自身包含 . (如 /person/joe@email.com),那匹配结果就不是我们所期望的,显然 ".com" 不是文件扩展名。
解决这个问题的正确方法是配置 Spring MVC 只对注册的文件扩展名做后缀匹配,这要求内容(扩展名)协商好。想做更多的了解,可以先看 Section 16.16.4, “Content Negotiation” 后看 Section 16.16.9, “Path Matching”,这里展示里如何启用后缀模式和如何只使用注册的后缀模式。
The URI specification RFC 3986 defines the possibility of including name-value pairs within path segments. There is no specific term used in the spec. The general "URI path parameters" could be applied although the more unique "Matrix URIs", originating from an old post by Tim Berners-Lee, is also frequently used and fairly well known. Within Spring MVC these are referred to as matrix variables.
Matrix variables can appear in any path segment, each matrix variable separated with a
";" (semicolon). For example: "/cars;color=red;year=2012". Multiple values may be
either "," (comma) separated "color=red,green,blue" or the variable name may be
repeated "color=red;color=green;color=blue".
If a URL is expected to contain matrix variables, the request mapping pattern must represent them with a URI template. This ensures the request can be matched correctly regardless of whether matrix variables are present or not and in what order they are provided.
Below is an example of extracting the matrix variable "q":
// GET /pets/42;q=11;r=22

@RequestMapping(value = "/pets/{petId}", method = RequestMethod.GET)
public void findPet(@PathVariable String petId, @MatrixVariable int q) {

    // petId == 42
    // q == 11

}
Since all path segments may contain matrix variables, in some cases you need to be more specific to identify where the variable is expected to be:
// GET /owners/42;q=11/pets/21;q=22

@RequestMapping(value = "/owners/{ownerId}/pets/{petId}", method = RequestMethod.GET)
public void findPet(
        @MatrixVariable(value="q", pathVar="ownerId") int q1,
        @MatrixVariable(value="q", pathVar="petId") int q2) {

    // q1 == 11
    // q2 == 22

}
A matrix variable may be defined as optional and a default value specified:
// GET /pets/42

@RequestMapping(value = "/pets/{petId}", method = RequestMethod.GET)
public void findPet(@MatrixVariable(required=false, defaultValue="1") int q) {

    // q == 1

}
All matrix variables may be obtained in a Map:
// GET /owners/42;q=11;r=12/pets/21;q=22;s=23

@RequestMapping(value = "/owners/{ownerId}/pets/{petId}", method = RequestMethod.GET)
public void findPet(
        @MatrixVariable Map<String, String> matrixVars,
        @MatrixVariable(pathVar="petId"") Map<String, String> petMatrixVars) {

    // matrixVars: ["q" : [11,22], "r" : 12, "s" : 23]
    // petMatrixVars: ["q" : 11, "s" : 23]

}
Note that to enable the use of matrix variables, you must set the
removeSemicolonContent property of RequestMappingHandlerMapping to false. By
default it is set to true.
| Tip |
|---|---|
|
The MVC Java config and the MVC namespace both provide options for enabling the use of matrix variables. If you are using Java config, The Advanced Customizations
with MVC Java Config section describes how the In the MVC namespace, the <?xml version="1.0" encoding="UTF-8"?> <beans xmlns="http://www.springframework.org/schema/beans" xmlns:mvc="http://www.springframework.org/schema/mvc" xmlns:xsi="http://www.w3.org/2001/XMLSchema-instance" xsi:schemaLocation=" http://www.springframework.org/schema/beans http://www.springframework.org/schema/beans/spring-beans.xsd http://www.springframework.org/schema/mvc http://www.springframework.org/schema/mvc/spring-mvc.xsd"> <mvc:annotation-driven enable-matrix-variables="true"/> </beans> |
你可以指定一系列可消费的媒体类型来压缩主要映射。这样只用当 Content-Type 请求头匹配可消费的媒体类型,才认为这个请求是可映射的。如:
@Controller
@RequestMapping(value = "/pets", method = RequestMethod.POST, consumes="application/json")
public void addPet(@RequestBody Pet pet, Model model) {
    // 实现省略
}
Consumable media type expressions can also be negated as in !text/plain to match to all requests other than those with Content-Type of text/plain.
| Tip |
|---|---|
|
consumes 条件支持在类和方法上使用。与大多数情况不一样的是,方法中 consumes 会覆盖类上使用 的consumes,而不是继承 类上使用 的consumes。 |
你可以指定一系列可消费的媒体类型来压缩主要映射。当 Accept 请求头匹配可消费的媒体类型,才认为这个请求是可映射的。此外,使用 produces 条件可以保证实际类容的类型,produces 用于形成 response 方面的媒体类型,如:
@Controller
@RequestMapping(value = "/pets/{petId}", method = RequestMethod.GET, produces="application/json")
@ResponseBody
public Pet getPet(@PathVariable String petId, Model model) {
    // 省略实现
}
Just like with consumes, producible media type expressions can be negated as in !text/plain to match to all requests other than those with an Accept header value of text/plain.
| Tip |
|---|---|
|
produces 条件支持在类和方法上使用。与大多数情况不一样的是,方法中 produces 会覆盖类上使用 的produces ,而不是继承 类上使用 的produces 。 |
你可以通过请求参数条件来压缩请求匹配范围,如使用 "myParam", "!myParam", 或 "myParam=myValue"。前两种情况表示 存在/不存在,第三种指定了参数值。如下给出指定参数值的例子:
@Controller
@RequestMapping("/owners/{ownerId}")
public class RelativePathUriTemplateController {

    @RequestMapping(value = "/pets/{petId}", method = RequestMethod.GET, params="myParam=myValue")
    public void findPet(@PathVariable String ownerId, @PathVariable String petId, Model model) {
        // 省略实现
    }

}
类似的,头字段也支持 存在/不存在 和基于指定头字段值的匹配:
@Controller
@RequestMapping("/owners/{ownerId}")
public class RelativePathUriTemplateController {

    @RequestMapping(value = "/pets", method = RequestMethod.GET, headers="myHeader=myValue")
    public void findPet(@PathVariable String ownerId, @PathVariable String petId, Model model) {
        // 省略实现
    }

}
| Tip |
|---|---|
|
尽管你可以使用媒体类型通配符来匹配 Content-Type 和 Accept 头字段(如 "content-type=text/*" 可以匹配 "text/plain" 和 "text/html"),还是建议使用 consumes 和 produces 条件,因为 consumes 和 produces 专门为此而使用的。 |
@RequestMapping 处理方法允许非常灵活的签名,其支持方法参数和返回值(在这一节谈到)。除了 BindingResult 参数,其他类型参数顺序随意(下一节会谈到)。
![[Note]](images/note.png) | Note |
|---|---|
|
Spring 3.1 介绍了一套 |
如下是可以支持的方法参数:
-
Request 或 response 对象 (Servlet API). 选择任意指定的 request 或 response 类型,如
ServletRequesto或HttpServletRequest. -
Session 对象 (Servlet API):需要是
HttpSession类型. 这种类型的参数会强制合适 session 的存在。因此,这个参数永远不会为 null。
| Note |
|---|---|
|
Session 访问可能是非线程安全的,特别是在 Servlet 环境。当允许多个请求并发访问 session 时,可以考虑设置 |
-
org.springframework.web.context.request.WebRequest或org.springframework.web.context.request.NativeWebRequest.允许通过请求参数访问和 request/session 属性访问,没有与原始的 Servlet/Portlet API 绑定。 -
java.util.Locale给当前请求本地化,取决于最具体的本地化解析器,实际上取决与是 Servlet 环境配置的LocaleResolver。 -
java.io.InputStream/java.io.Reader可访问请求的内容。这是 Servlet API 暴露的原生 InputStream/Reader 。 -
java.io.OutputStream/java.io.Writer用于 产生 response 的内容。这是 Servlet API 暴露的原生 OutputStream/Writer. -
org.springframework.http.HttpMethod可访问 HTTP 请求方法。 -
java.security.Principal包含了当前授权用户。 -
@PathVariable注解参数,可访问 URI 模版变量。可查看 the section called “URI 模版模式”。 -
@MatrixVariableannotated parameters for access to name-value pairs located in URI path segments. See the section called “矩阵变量”. -
@RequestParam注解参数,可访问指定 Servlet request 参数。参数值会被转换为方法参数的类型。可查看the section called “使用 @RequestParam 将请求参数绑定到方法参数”. -
@RequestHeader注解参数,可访问指定 Servlet request 的 HTTP 头字段。参数值会被转换为方法参数的类型。可查看 the section called “使用 @RequestHeader 映射请求头字段属性” -
@RequestBody注解参数,可访问 HTTP 请求体。参数值使用HttpMessageConverter转换为方法参数类型,可查看 the section called “使用 @RequestBody 映射请求体” -
@RequestPart注解参数,可访问 "multipart/form-data" 请求的内容。可查看 Section 16.10.5, “Handling a file upload request from programmatic clients” 和 Section 16.10, “Spring’s multipart (文件上传) 支持” -
HttpEntity<?>参数,可访问 Servlet request 的HTTP 头和内容。请求流使用HttpMessageConverter转换为 entity body,可查看 the section called “使用 HttpEntity” -
java.util.Map/org.springframework.ui.Model/org.springframework.ui.ModelMap用来丰富隐式模型(暴露给 web 视图) -
org.springframework.web.servlet.mvc.support.RedirectAttributesto specify the exact set of attributes to use in case of a redirect and also to add flash attributes (attributes stored temporarily on the server-side to make them available to the request after the redirect).RedirectAttributesis used instead of the implicit model if the method returns a "redirect:" prefixed view name orRedirectView. -
Command or form objects to bind request parameters to bean properties (via setters) or
directly to fields, with customizable type conversion, depending on
@InitBindermethods and/or the HandlerAdapter configuration. See thewebBindingInitializerproperty onRequestMappingHandlerAdapter. Such command objects along with their validation results will be exposed as model attributes by default, using the command class class name - e.g. model attribute "orderAddress" for a command object of type "some.package.OrderAddress". TheModelAttributeannotation can be used on a method argument to customize the model attribute name used. -
org.springframework.validation.Errors/org.springframework.validation.BindingResult已执行的命令或表单对象的验证错误(the immediately preceding method argument). -
org.springframework.web.bind.support.SessionStatusstatus handle for marking form processing as complete, which triggers the cleanup of session attributes that have been indicated by the@SessionAttributesannotation at the handler type level. -
org.springframework.web.util.UriComponentsBuildera builder for preparing a URL relative to the current request’s host, port, scheme, context path, and the literal part of the servlet mapping.
Errors 或 BindingResult 参数必须跟随所绑定的模型对象,如果方法签名有超过一个模型对象的,Spring 会为其分别创建 BindingResult 实例。因此,如下例子没有效果:
BindingResult and @ModelAttribute 的无效顺序.
@RequestMapping(method = RequestMethod.POST)
public String processSubmit(@ModelAttribute("pet") Pet pet, Model model, BindingResult result) { ... }
注意,因为 Pet 和 BindingResult 之间存在参数 Model。要其有效,你需要重新排序参数等我位置,如下:
@RequestMapping(method = RequestMethod.POST)
public String processSubmit(@ModelAttribute("pet") Pet pet, BindingResult result, Model model) { ... }
| Note |
|---|---|
|
JDK 1.8’s |
以下是可支持的返回类型:
-
A
ModelAndViewobject, with the model implicitly enriched with command objects and the results of@ModelAttributeannotated reference data accessor methods. -
A
Modelobject, with the view name implicitly determined through aRequestToViewNameTranslatorand the model implicitly enriched with command objects and the results of@ModelAttributeannotated reference data accessor methods. -
A
Mapobject for exposing a model, with the view name implicitly determined through aRequestToViewNameTranslatorand the model implicitly enriched with command objects and the results of@ModelAttributeannotated reference data accessor methods. -
A
Viewobject, with the model implicitly determined through command objects and@ModelAttributeannotated reference data accessor methods. The handler method may also programmatically enrich the model by declaring aModelargument (see above). -
A
Stringvalue that is interpreted as the logical view name, with the model implicitly determined through command objects and@ModelAttributeannotated reference data accessor methods. The handler method may also programmatically enrich the model by declaring aModelargument (see above). -
voidif the method handles the response itself (by writing the response content directly, declaring an argument of typeServletResponse/HttpServletResponsefor that purpose) or if the view name is supposed to be implicitly determined through aRequestToViewNameTranslator(not declaring a response argument in the handler method signature). -
If the method is annotated with
@ResponseBody, the return type is written to the response HTTP body. The return value will be converted to the declared method argument type usingHttpMessageConverters. See the section called “使用 @ResponseBody 映射响应体”. -
An
HttpEntity<?>orResponseEntity<?>object to provide access to the Servlet response HTTP headers and contents. The entity body will be converted to the response stream usingHttpMessageConverters. See the section called “使用 HttpEntity”. -
An
HttpHeadersobject to return a response with no body. -
A
Callable<?>can be returned when the application wants to produce the return value asynchronously in a thread managed by Spring MVC. -
A
DeferredResult<?>can be returned when the application wants to produce the return value from a thread of its own choosing. -
A
ListenableFuture<?>can be returned when the application wants to produce the return value from a thread of its own choosing. -
Any other return type is considered to be a single model attribute to be exposed to
the view, using the attribute name specified through
@ModelAttributeat the method level (or the default attribute name based on the return type class name). The model is implicitly enriched with command objects and the results of@ModelAttributeannotated reference data accessor methods.
在控制器里,使用 @RequestParam 将请求参数绑定到方法参数。
如下代码片段演示了其用法:
@Controller
@RequestMapping("/pets")
@SessionAttributes("pet")
public class EditPetForm {

    // ...

    @RequestMapping(method = RequestMethod.GET)
    public String setupForm(@RequestParam("petId") int petId, ModelMap model) {
        Pet pet = this.clinic.loadPet(petId);
        model.addAttribute("pet", pet);
        return "petForm";
    }

    // ...

}
使用 @RequestParam 的参数默认是必须提供的,当然,你可以指定其为可选的,将 @RequestParam 的 reqired 属性设置 false 即可。(如, @RequestParam(value="id", required=false)).
如果方法参数的类型不是 String,类型转换会自动执行,可查看 the section called “方法参数和类型转换”。
如果将 @RequestParam 用于 Map<String, String> 或
MultiValueMap<String, String> 参数,此参数 map 会填充所有的请求参数。
@RequestBody 注解参数表示该参数将与 HTTP 请求体绑定。例子:
@RequestMapping(value = "/something", method = RequestMethod.PUT)
public void handle(@RequestBody String body, Writer writer) throws IOException {
    writer.write(body);
}
你使用 HttpMessageConverter 将请求体转换为方法参数。HttpMessageConverter 负责将请求信息转换为指定对象和将指定对象转换为请求体。RequestMappingHandlerAdapter 默认支持 @RequestBody 使用以下 HttpMessageConverters。
-
ByteArrayHttpMessageConverter转换为字节数组。 -
StringHttpMessageConverter转换为字符串。 -
FormHttpMessageConverter表单数据与 MultiValueMap<String, String> 互转。 -
SourceHttpMessageConverter表单数据与 javax.xml.transform.Source 互转。
转换起的详细信息,可查看 Message Converters。也提醒一下,当使用 MVC 命名空间 或 MVC Java 配置时,默认注册了一系列转换器,详细信息可查看 Section 16.16.1, “启用 MVC Java 配置或 MVC XML 命名空间”。
如果你想读写 XML 的,需要注册 MarshallingHttpMessageConverter,MarshallingHttpMessageConverter 包含了 org.springframework.oxm 包中的 Marshaller 和 Unmarshaller 实现。如下例子演示了直接在配置文件注册 MarshallingHttpMessageConverter,如果你的应用通过 MVC 命名空间或 MVC Java 配置的,可查看 Section 16.16.1, “启用 MVC Java 配置或 MVC XML 命名空间”。
<bean class="org.springframework.web.servlet.mvc.method.annotation.RequestMappingHandlerAdapter">
    <property name="messageConverters">
        <util:list id="beanList">
            <ref bean="stringHttpMessageConverter"/>
            <ref bean="marshallingHttpMessageConverter"/>
        </util:list>
    </property
</bean>

<bean id="stringHttpMessageConverter"
        class="org.springframework.http.converter.StringHttpMessageConverter"/>

<bean id="marshallingHttpMessageConverter"
        class="org.springframework.http.converter.xml.MarshallingHttpMessageConverter">
    <property name="marshaller" ref="castorMarshaller" />
    <property name="unmarshaller" ref="castorMarshaller" />
</bean>

<bean id="castorMarshaller" class="org.springframework.oxm.castor.CastorMarshaller"/>
@RequestBody 方法参数可添加 @Valid 注解,被注解的参数会使用配置的 Validator 来验证。当使用 MVC 命名空间或 mvc Java 配置时,应用会自动配置 JSR-303 验证器(前提是在类路径能找到 JSR-303 的实现)。
类似于 @ModelAttribute 参数,Errors 参数也可用来检测错误。当 Errore 参数没有声明时,或抛出 MethodArgumentNotValidException。此异常会被 DefaultHandlerExceptionResolver 处理 —— 向客户端发送 400 错误。
| Note |
|---|---|
|
可以查看 Section 16.16.1, “启用 MVC Java 配置或 MVC XML 命名空间”,了解如何使用 MVC 命名空间和 MVC Java 配置来配置信息转换器和验证器。 |
@ResponseBody 的使用类似于 @RequestBody。此注解用在方法上,用来表示直接将返回数据写到 HTTP 响应体里。注意,不是将数据放到 Model 中,或解析为视图名称。例子:
@RequestMapping(value = "/something", method = RequestMethod.PUT)
@ResponseBody
public String helloWorld() {
    return "Hello World";
}
上述例子会将 Hello World 文本写到 HTTP 响应流中。
与 @RequestBody 一样,Spring 使用 HttpMessageConverter 将返回对象转换为响应体。转换的详细信息可以查看上一节信息转换器。
一种比较常见的场景,控制器实现 REST API,只会返回 JSON、XML 或其他自定义媒体类型。为了方便,你可以在控制器上添加 @RestController 注解,而不是在每一个 @RequestMapping 上使用 @ResponseBody。
@RestController 是一个结合了 @ResponseBody 和 @Controller 的注解。不仅如此,@RestController 赋予了控制器更多的意义,在未来的版本中可能会携带额外的语义。。
与常规 @Controller 一样,@RestController 可以协助 @ControllerAdvice bean。详细信息可查看the section called “使用 @ControllerAdvice 注解增强控制器”。
HttpEntity 的用法类似于 @RequestBody 和 @ResponseBody 注解。除了可以访问请求/响应体,HttpEntity(和特用与响应的子类 ResponseEntity) 还可以访问 request 和 response 的头字段。例子:
@RequestMapping("/something")
public ResponseEntity<String> handle(HttpEntity<byte[]> requestEntity) throws UnsupportedEncodingException {
    String requestHeader = requestEntity.getHeaders().getFirst("MyRequestHeader"));
    byte[] requestBody = requestEntity.getBody();

    // do something with request header and body

    HttpHeaders responseHeaders = new HttpHeaders();
    responseHeaders.set("MyResponseHeader", "MyValue");
    return new ResponseEntity<String>("Hello World", responseHeaders, HttpStatus.CREATED);
}
上述例子获取了 MyRequestHeader 头字段的值,以字节数组的形式读取了请求体,随后将 MyRequestHeader 添加到 response,将 Hello World 写到响应流和设置响应状态码为 201(Created).
与 @RequestBody 和 @ResponseBody 一样,Srping 使用 HttpMessageConverter 将数据与请求/响应流互转,可查看上一节信息转换器
@ModelAttribute 可用欲方法或方法参数中。这一部分将介绍 @ModelAttribute 在方法中的使用,下一部分介绍其在方法啊参数中的使用。
在方法上使用 @ModelAttribute 注解,表示此方法的目的在于添加一个或多个模型属性。这种方法所支持的参数类型与 @RequestMapping 一样,不同的是,其不能直接映射到 request。另外,在同一个控制器里,@ModelAttribute 会在 @RequestMapping 之前调用。举几个例子:
// 添加一个属性
// 方法的返回值会以 "account" 键添加到 model
// 可通过 @ModelAttribute("myAccount") 自定义

@ModelAttribute
public Account addAccount(@RequestParam String number) {
    return accountManager.findAccount(number);
}

// 添加多个属性

@ModelAttribute
public void populateModel(@RequestParam String number, Model model) {
    model.addAttribute(accountManager.findAccount(number));
    // 再添加多个……
}
@ModelAttribute 用来将常用属性填充到模型里。如:填充下拉框陈述、宠物类型、或命令对象(如 Account,用于表示 HTML 表单数据)。最后一种情况会在下一部分深入谈论。
留意一下 @ModelAttribute 方法的两种使用方式。第一种,在方法里隐式添加一个属性并返回;第二种,方法里接收 Model 参数,并将任意个属性添加到 Model中。你可以根据自身需要选择其中一种使用方式。
一个控制器可以有多个 @ModelAttribute 方法。在同一个控制器中,所有 @ModelAttribute 方法都会在 @RequestMapping 方法之前调用。
@ModelAttribute 方法也可以在 @ControllerAdvice 注解的类中使用,类似的可应用于其他控制器,详细信息可查看 the section called “使用 @ControllerAdvice 注解增强控制器”。
| Tip |
|---|---|
|
当模型属性名称没有显式定义,会是一种什么样的情况?在这种情况下,默认使用参数类型名称作为模型属性名称。如,当方法返回 |
@ModelAttribute 注解也可用在 @RequestMapping 方法中。这种情况下,@RequestMapping 方法的返回值将解析为模型属性,而不是视图名称。相反,视图名称来源于视图名称的约定,就类似于方法返回 void,可查看Section 16.13.3, “The View - RequestToViewNameTranslator”。
如前文所述,@ModelAttribute 也可以用在方法或方法参数上。这一部分将介绍其在方法参数上的使用。
@ModelAttribute 注解的方法参数,表示该参数会从模型中检索。如果该参数不在模型中,此参数会先执行初始化或后添加到模型里;如果参数存在模型里,此参数字段会填充所有匹配其名称的请求参数。这就是大家熟知的 Spring MVC 数据绑定 —— 一个可以免除你逐个解析表单属性而又非常有用的机制。
@RequestMapping(value="/owners/{ownerId}/pets/{petId}/edit", method = RequestMethod.POST)
public String processSubmit(@ModelAttribute Pet pet) { }
上述所给例子,Pet 实例可以在哪里获取?有以下几种选择:
-
可能已存到模型里,自然可从模型中获取,因为使用了
@SessionAttributes— 可查看 the section called “使用 @SessionAttributes 将模型属性存储到 HTTP session”。 -
可能已存到模型里,自然可从模型中获取,因为同一个控制器里的
@ModelAttribute方法 — 在上一部分有解释。 - 可以从 URI 模版变量和类型转换器获取(在下面详细描述会有所说明)
- 可以使用默认构造函器初始化
@ModelAttribute 方法是一种从数据库检索索性的常用方式,所检索到的属性可以使用 @SessionAttributes 在请求之间存储。在某些情况下,使用 URI 模版变量和类型转化器可能会方便一些,举个例子:
@RequestMapping(value="/accounts/{account}", method = RequestMethod.PUT)
public String save(@ModelAttribute("account") Account account) {

}
上面这个例子,模型属性名称(这里为 "account") 可以映射 URI 模版模版变量。如果你注册了 Converter<String, Account>(一个可将 String 类型的 account 值转换为 Account实例),那上述例子在没有 @ModelAttribute 方法下,也是可工作的。
下一步是数据绑定。WebDataBinder 类映射请求参数名 —— 包括查询字符参数和表单属性 —— 根据名称添加模型属性。在类型转换之后,如果需要,映射属性会被填充。数据绑定在验证在 Chapter 7, 数据校验、数据绑定和类型转换 有介绍,在控制器层自定义数据绑定的处理方法,在 the section called “自定义 WebDataBinder 的初始化” 有介绍。
在处理数据绑定中,可能会抛出错误(如缺失必要属性或类型转换错误)。如要检查这些错误,可在 @ModelAttribute 参数后添加 BindingResult 参数。
@RequestMapping(value="/owners/{ownerId}/pets/{petId}/edit", method = RequestMethod.POST)
public String processSubmit(@ModelAttribute("pet") Pet pet, BindingResult result) {

    if (result.hasErrors()) {
        return "petForm";
    }

    // ...

}
使用 BindingResult, 你可以判断是否存在数据绑定错误。当存在错误时,通常会渲染此表单 —— 通过 Spring 的 <errors> 表单标签展示这些错误。
除了数据绑定,你也可以通过自定以验证器传递 BindingResult 来执行验证。当中 BindingResult 保存了数据绑定的错误。这样可以允许数据绑定和验证错误统一收集,随后回馈给用户。
@RequestMapping(value="/owners/{ownerId}/pets/{petId}/edit", method = RequestMethod.POST)
public String processSubmit(@ModelAttribute("pet") Pet pet, BindingResult result) {

    new PetValidator().validate(pet, result);
    if (result.hasErrors()) {
        return "petForm";
    }

    // ...

}
你也可以自动执行验证,配置 JSR-303 `@Valid 注解即可。
@RequestMapping(value="/owners/{ownerId}/pets/{petId}/edit", method = RequestMethod.POST)
public String processSubmit(@Valid @ModelAttribute("pet") Pet pet, BindingResult result) {

    if (result.hasErrors()) {
        return "petForm";
    }

    // ...

}
至于如何配置和使用验证,可查看 Section 7.8, “Spring Validation” 和 Chapter 7, 数据校验、数据绑定和类型转换。
类上的 @SessionAttributes 注解,声明了 session 属性可以被指定 hadler 使用。这通常会列出需要透明存储到 session 或其他会话存储的模型属性或模型属性的类型,作为后续请求的 form-backing beam。
如下代码片段展示了 @SessionAttributes 的用法,其指定了模型属性名称:
@Controller
@RequestMapping("/editPet.do")
@SessionAttributes("pet")
public class EditPetForm {
    // ...
}
在重定向 URL 中,所有模型属性默认暴露给 URI 模版变量,剩下的属性(原始类型或原始类型集合/数组)会自动拼接到查询参数中。
然而,在一个带注解的控制器中,模型也许包含了额外的属性(用于渲染,如下拉框属性)。在重定向场景中,要准确控制这些属性,可在 @RequestMapping 方法中声明 RedirectAttributes 类型参数,并往其添加 RedirectView 使用的属性。如果这个控制方法没有重定向,将使用 RedirectAttributes 的内容,否则使用默认 Model 的内容。
RequestMappingHandlerAdapter 提供了一个 "ignoreDefaultModelOnRedirect" 标志,用来设置在控制方法重定向时,默认Model 的内容是否从不使用。相反,控制器方法应该声明 RedirectAttributes 类型属性,否则会没有任何属性传递给 RedirectView。为了向后兼容,MVC 命名空间和 MVC Java 配置都将 "ignoreDefaultModelOnRedirect" 设置为 false。可我们还是建议你在新应用里将其设置为 true。
RedirectAttributes 接口也可以用来添加 flash 属性。与其他重定向属性(在重定向 URL 中销毁)不同的是,flash 属性会保存到 HTTP session(因此 flash 属性也不会在 URL 上出现)。作用于重定向 URL 的控制器里的模型会自动接收这些 flash 属性,之后,flash 属性会从 session 中移除。可查看 Section 16.6, “使用 flash 属性”,了解 Spring MVC 对 flash 属性的常规支持。
前一节节介绍了 @ModelAttribute 在客户端浏览器表单提交的使用。同时也推荐使用 @ModelAttribute 处理非浏览器提交的请求。然而,在处理 HTTP PUT 请求时,这里存在了一个明显的不同。浏览器支持通过 HTTP GET 或 HTTP POST 方法提交表单数据。非浏览器也支持通过 HTTP PUT 方法提交表单。这里提出了一个挑战 —— 因为 Servlet 规范要求 ServletRequest.getParameter*() 方法需要支持表单属性访问,而这只适用于 HTTP POST,不适用于 HTTP PUT。
为了支持 HTTP PUT 和 PATCH 请求,spring-web 模块提供了 HttpPutFormContentFilter 过滤器,此过滤器可 web.xml 配置:
<filter>
    <filter-name>httpPutFormFilter</filter-name>
    <filter-class>org.springframework.web.filter.HttpPutFormContentFilter</filter-class>
</filter>

<filter-mapping>
    <filter-name>httpPutFormFilter</filter-name>
    <servlet-name>dispatcherServlet</servlet-name>
</filter-mapping>

<servlet>
    <servlet-name>dispatcherServlet</servlet-name>
    <servlet-class>org.springframework.web.servlet.DispatcherServlet</servlet-class>
</servlet>
HttpPutFormContentFilter 过滤器拦截了content 类型为 application/x-www-form-urlencoded 的 HTTP PUT 和 PATCH 请求,它从请求体中读取表单数据并将其封装为 ServletRequest,以便后续使用 ServletRequest.getParameter*() 方法获取表单数据。
| Note |
|---|---|
|
由于 |
@CookieValue 注解允许将方法参数与HTTP cookie 值绑定。
假设下面这个 cookie 值已经从 http 请求获得。 Let us consider that the following cookie has been received with an http request:
JSESSIONID=415A4AC178C59DACE0B2C9CA727CDD84
一下例子演示了如何获取 JSESSIONID cookie 值。
@RequestMapping("/displayHeaderInfo.do")
public void displayHeaderInfo(@CookieValue("JSESSIONID") String cookie) {
    //...
}
如果方法参数不是 String 类型,类型转换会自动执行,可查看 the section called “方法参数和类型转换”。
@CookieValue 注解支持在 Servlet 和 Portlet 环境中注解 handler 方法。
@RequestHeader 注解允许将方法参数与请求头字段绑定。
如下一个请求头字段值的样例:
Host                    localhost:8080
Accept                  text/html,application/xhtml+xml,application/xml;q=0.9
Accept-Language         fr,en-gb;q=0.7,en;q=0.3
Accept-Encoding         gzip,deflate
Accept-Charset          ISO-8859-1,utf-8;q=0.7,*;q=0.7
Keep-Alive              300
如下代码演示了如何获取 Accept-Encoding 和 Keep-Alive 头字段值:
@RequestMapping("/displayHeaderInfo.do")
public void displayHeaderInfo(@RequestHeader("Accept-Encoding") String encoding,
        @RequestHeader("Keep-Alive") long keepAlive) {
    //...
}
如果方法参数不是 String 类型,类型转换会自动执行,可查看 the section called “方法参数和类型转换”。
将注解 @RequestHeader 用于 Map<String, String>,MultiValueMap<String, String>, 或 HttpHeaders 参数,map 会填充所有头字段值。
| Tip |
|---|---|
|
内置支持将逗号分隔的字符串转换为数组/集合 或 系统其他熟知的类型。比如,带有 |
@RequestHeader 注解支持在 Servlet 和 Portlet 环境中注解 handler 方法。
从请求(包括请求参数、路径参数、请求头和cookie)里提取的字符串,基本上都需要转换为方法参数或类属性的目标类型,如将请求参数绑定到 @ModelAttribute 参数属性。如果目标类型不是 String,Spring 自动将其转换为合适的类型。支持所有简单类型的转换(如 int、long、Date等)。你可以进一步通过 WebDataBinder 自定义处理过程(可查看the section called “自定义 WebDataBinder 的初始化”)或使用 FormattingConversionService 注册 Formatters(可查看 Section 7.6, “Spring Field Formatting”)。
To customize request parameter binding with PropertyEditors through Spring’s
WebDataBinder, you can use @InitBinder-annotated methods within your controller,
@InitBinder methods within an @ControllerAdvice class, or provide a custom
WebBindingInitializer. See the the section called “使用 @ControllerAdvice 注解增强控制器” section for more details.
使用 @InitBinder 注解的控制器,可以直接配置绑定 web 数据。@InitBinder 表示那些用于初始化 WebDataBinder 的方法,将用于填充 注解 handler 方法的命名/表单对象参数。
除了命令/表单对象和类似验证结果对象,这些初始化绑定方法支持 @RequestMapping 所支持的所有参数。初始化绑定方法规定没有返回值。因此,这些方法常声明为 void,通常也会包含 WebDataBinder 参数,与 WebRequest 或 java.util.Locale 结合使用,可注册上下文特定的编辑器。
如下例子,演示了 @InitBinder 的使用 —— 配置一个解释所有表单 java.util.Date 属性的 CustomDateEditor:
@Controller
public class MyFormController {

    @InitBinder
    public void initBinder(WebDataBinder binder) {
        SimpleDateFormat dateFormat = new SimpleDateFormat("yyyy-MM-dd");
        dateFormat.setLenient(false);
        binder.registerCustomEditor(Date.class, new CustomDateEditor(dateFormat, false));
    }

    // ...

}
需要详细初始化数据绑定的,你可以提供一个 WebBindingInitializer 接口的自定义实现,然后再提供一个 AnnotationMethodHandlerAdapter 的自定义以配置 bean,便可覆盖数据绑定默认的配置。
来自 PetClinic 应用的例子,演示了如何配置:使用了 WebBindingInitializer 接口的自定义实现,和一个 org.springframework.samples.petclinic.web.ClinicBindingInitializer类(这个类配置了 PetClinic 多个控制器所使用的 PropertyEditors) :
<bean class="org.springframework.web.servlet.mvc.method.annotation.RequestMappingHandlerAdapter">
    <property name="cacheSeconds" value="0" />
    <property name="webBindingInitializer">
        <bean class="org.springframework.samples.petclinic.web.ClinicBindingInitializer" />
    </property>
</bean>
@InitBinder 方法也可在 @ControllerAdvice- 注解的类中使用, 这种情况下,@InitBinder 用于映射控制器。这也提供另外一种选择 —— 使用 WebBindingInitializer,详情可查看 the section called “使用 @ControllerAdvice 注解增强控制器”。
依据 Servlet API 对 getLastModified 方法的定义,@RequestMapping 方法也可以支持 'Last-Modified' HTTP 请求,以方便内容缓存,加快响应。getLastModified 方法的调用,需要计算给定请求的 lastModified 值(long 类型),并将其与请求头 'If-Modified-Since' 相互比较,若认为其没有更新,返回状态码为 304 的 response。注解控制器可如此实现这一需求:
@RequestMapping
public String myHandleMethod(WebRequest webRequest, Model model) {

    long lastModified = // 1. 应用指定的计算值

    if (request.checkNotModified(lastModified)) {
        // 2. 快速退出 —— 不作进一步处理
        return null;
    }
    // 3. 否则,进一步处理请求,本质是准备内容
    model.addAttribute(...);
    return "myViewName";
}
注意两个关键点:调用 request.checkNotModified(lastModified) 和 返回 null。前者将 response 的状态设置为 304 后才返回 true。后者,与前者的使用结合,告知 Spring MVC 不对请求作进一步的处理。
@ControllerAdvice 注解可以让实现类通过类路径自动检测出来。当使用 MVC 命名空间或 MVC Java 配置时,此此功能是默认启动的。
带有 @ControllerAdvice 注解的类,可以包含 @ExceptionHandler、@InitBinder, 和 @ModelAttribute 注解的方法,并且这些注解的方法会通过控制器层次应用到所有 @RequestMapping 方法中,而不用一一在控制器内部声明。
Classes annotated with @ControllerAdvice can contain @ExceptionHandler,
@InitBinder, and @ModelAttribute annotated methods, and these methods will apply to
@RequestMapping methods across all controller hierarchies as opposed to the controller
hierarchy within which they are declared.
@ControllerAdvice 注解也可在属性中注明,将应用到哪些目标控制器:
// 应用到所有 @RestController 控制器
@ControllerAdvice(annotations = RestController.class)
public class AnnotationAdvice {}

// 应用到指定包下的控制器
@ControllerAdvice("org.example.controllers")
public class BasePackageAdvice {}

// 应用到指定类型的控制器
@ControllerAdvice(assignableTypes = {ControllerInterface.class, AbstractController.class})
public class AssignableTypesAdvice {}
希望加深了解的,可以 Check out
@ControllerAdvice
文档。
在将对象序列化到响应体时,偶尔需要过滤敏感的数据。为了提供这一功能,Spring MVC 内置支持使用 Jackson 序列化视图。
可在带有 @ResponseBody 注解的方法或返回ResponseEntity 的方法中使用Jackson 序列化视图,只需要添加一个带 class 参数的@JsonView即可(class 参数指定所使用的视图类或接口)。
@RestController
public class UserController {

    @RequestMapping(value = "/user", method = RequestMethod.GET)
    @JsonView(User.WithoutPasswordView.class)
    public User getUser() {
        return new User("eric", "7!jd#h23");
    }
}

public class User {

    public interface WithoutPasswordView {};
    public interface WithPasswordView extends WithoutPasswordView {};

    private String username;
    private String password;

    public User() {
    }

    public User(String username, String password) {
        this.username = username;
        this.password = password;
    }

    @JsonView(WithoutPasswordView.class)
    public String getUsername() {
        return this.username;
    }

    @JsonView(WithPasswordView.class)
    public String getPassword() {
        return this.password;
    }
}
| Note |
|---|---|
|
注意:尽管 |
对于控制器依赖于视图解析的情况,只需将序列化的视图类添加到模型里,即可。
@Controller
public class UserController extends AbstractController {

    @RequestMapping(value = "/user", method = RequestMethod.GET)
    public String getUser(Model model) {
        model.addAttribute("user", new User("eric", "7!jd#h23"));
        model.addAttribute(JsonView.class.getName(), User.WithoutPasswordView.class);
        return "userView";
    }
}
若需要支持在 @ResponseBody 和 ResponseEntity 方法中支持 JSONP 的使用,可以定一个 @ControllerAdvice bean 并继承 AbstractJsonpResponseBodyAdvice 类。AbstractJsonpResponseBodyAdvice 的构造器说明 JSONP 的查询参数。具体例子如下:
@ControllerAdvice
public class JsonpAdvice extends AbstractJsonpResponseBodyAdvice {

    public JsonpAdvice() {
        super("callback");
    }
}
对于控制器依赖于视图解析的情况,只需要请求带有 jsonp 或 callback 查询参数,JSONP 会自动激活。JSONP 查询参数可以通过 jsonpParameterNames 属性自定义。
Spring MVC 引入了基于异步请求的 Servlet 3。在异步请求中,控制器方法通常会返回 java.util.concurrent.Callable 对象后再使用一个独立的线程产生返回值,而不是直接返回一个值。同时释放 Servlet 容器的主线程和允许处理其他请求。Spring MVC 借助 TaskExecutor ,在一个独立线程中调用 Callable,当 Callable 返回时,将请求转发到 Servlet 容器并继续处理 Callable 返回值。例子如下:
@RequestMapping(method=RequestMethod.POST)
public Callable<String> processUpload(final MultipartFile file) {

    return new Callable<String>() {
        public String call() throws Exception {
            // ...
            return "someView";
        }
    };

}
异步请求的另外一种方式,是让控制器返回 DeferredResult 实例。这种情况下,依然是从一个独立线程处理并产生返回值。然而,Spring MVC 并不知晓这个线程的后续处理。比如说,这个返回结果可以用来响应某些外部事件(如 JMS 信息,计划任务等)。例子如下:
@RequestMapping("/quotes")
@ResponseBody
public DeferredResult<String> quotes() {
    DeferredResult<String> deferredResult = new DeferredResult<String>();
    // 将 deferredResult 保存到内存队列
    return deferredResult;
}

// 在其他线程中...
deferredResult.setResult(data);
如果不了解 Servlet 3 异步处理的细节,理解起来可能会一定的难度。当然,这里会帮助你去理解。我们最少需要知道以下事实:
-
一个
ServletRequest请求可通过调用request.startAsync()方法设置为异步模式。此步骤最主要的作用是,在此 Servlet 和其他过滤器退出的情况下,response 依然可以保持打开状态,以便其他线程来完成处理。 -
调用
request.startAsync()方法返回一个AsyncContext。在异步处理中,AsyncContext可以用来做进一步的控制。比如说,AsyncContext提供的dispatch方法,可以在应用线程中调用,将请求转发回 Servlet 容器。异步 dispatch(转发)类似于平时使用的 forward 方法。不同的是,异步 dispatch(转发)是从应用里的一个线程转发到 Servlet 容器中的另一个线程,而 forward 方法则是在 Servlet 容器里的同一个线程间转发。 -
ServletRequest可以方位当前的DispatcherType(转发类型),此功能可以用于判断 Servlet 或 Filter 是在原始请求线程上处理请求,还是在异步转发线程中处理。
记住以上事实之后,接着了解一下异步请求处理 Callable 的过程:(1) 控制器返回一个 Callable ,(2) Spring MVC 开始异步处理,将 Callable 提交给 TaskExecutor,TaskExecutor 在一个独立线程中处理,(3) DispatcherServlet 和所有过滤器退出请求处理线程,不过保持 response 为打开状态,(4) Callable 产生一个结果之后,Spring MVC 将这个请求转发回 Servlet 容器,(5) 再次调用 DispatcherServlet,并重新处理 Callable 异步产生的结果。(2),(3),(4) 的准确顺序在不同情况下可能有所不同,这个取决于并发线程的处理速度。
异步请求处理 DeferredResult 的事件顺序大体上和处理 Callable 的顺序相同。不同的是,这里是由应用程序的某些线程来处理异步结果:(1) 控制器返回一个 DeferredResult 对象,并将其保存到可访问的内存队列或列表中,(2) Spring MVC 开始异步处理,(3) DispatcherServlet 和所有过滤器退出请求处理线程,不过保持 response 为打开状态,(4) 应用程序在某些线程中设置 DeferredResult,之后 Spring MVC 将这个请求转发回 Servlet 容器,(5) 再次调用 DispatcherServlet,并重新处理异步产生的结果。
解释了异步请求处理的机制,至于何时和为什么使用异常请求处理,就超出了此文档的介绍范围。需要深入了解的,可以查看 这一系列博客.
当控制器返回的 Callable 在执行时反生了异常,会出现什么情况?这种情况类似于控制器发生异常时的情况。所出现的异常会由同一控制器里的 @ExceptionHandler 方法处理,或由所配置的 HandlerExceptionResolver 实例来处理。
| Note |
|---|---|
|
在后台,当 |
如果是执行 DeferredResult 时出现异常,你可以选择调用 DeferredResult 提供的 setErrorResult(Object) 方法,该方法须提供一个异常或其他你设置设置的对象。 当结果是一个 Exception 时,会由同一控制器里的 @ExceptionHandler 方法处理,或由所配置的 HandlerExceptionResolver 实例来处理。
HandlerInterceptor 可以实现 AsyncHandlerInterceptor 接口,此接口额外提供一个 afterConcurrentHandlingStarted 方法。该方法会在初始请求处线程退出 和 异步处理开始之后调用。详细信息可参考 AsyncHandlerInterceptor javadocs 。
也可以选择使用 DeferredResult 直接提供的异步请求生命周期回调函数,当中包括了 onTimeout(Runnable) 和 onCompletion(Runnable) 方法。这两个方法会分别在异步请求超时或完成时调用。超时事件可通过设置 DeferredResult 部分值来处理,然而,完成时的回调意味着结束,即不能再设置返回结果。
Callable 也可以使用类似的回调功能。可是,你需要将 Callable 封装成 WebAsyncTask 实例,接着使用这个实例注册超时和完成时事件。如此便可像 DeferredResult 那样,处理超时时间和在完成时返回一个值。
你可以通过 MVC Java 配置或 MVC 命名空间,注册全局性的 CallableProcessingInterceptor 或 DeferredResultProcessingInterceptor。这两个拦截器提供了完成的回调机制,而且每次使用 Callable 或 DeferredResult 都会应用这两个拦截器。
使用 Servlet 3 的异步请求处理,需要将 web.xml 的版本更新为 3.0。
<web-app xmlns="http://java.sun.com/xml/ns/javaee"
    xmlns:xsi="http://www.w3.org/2001/XMLSchema-instance"
            http://java.sun.com/xml/ns/javaee
            http://java.sun.com/xml/ns/javaee/web-app_3_0.xsd"
    version="3.0">

    ...

</web-app>
DispatcherServlet 和任意 Filter 的配置都需要有 <async-supported>true</async-supported> 子元件。另外,任意会在异步转发中调用的 Filter 都需要支持 ASYNC 转发类型。提示,使用 Spring 框架时,让所有过滤器都支持 ASYNC 转发类型是安全的,因为除非是需要用到,否则他们在异步转发中也不会被调用。
![[Warning]](images/warning.png) | Warning |
|---|---|
|
注意,对部分过滤器来说,请确保它们会在异步转发时被映射调用。比如,当一个过滤器是负责释放数据库连接的(如 如下,是一个过滤器配置的样例: |
<web-app xmlns="http://java.sun.com/xml/ns/javaee"
    xmlns:xsi="http://www.w3.org/2001/XMLSchema-instance"
    xsi:schemaLocation="
            http://java.sun.com/xml/ns/javaee
            http://java.sun.com/xml/ns/javaee/web-app_3_0.xsd"
    version="3.0">

    <filter>
        <filter-name>Spring OpenEntityManagerInViewFilter</filter-name>
        <filter-class>org.springframework.~.OpenEntityManagerInViewFilter</filter-class>
        <async-supported>true</async-supported>
    </filter>

    <filter-mapping>
        <filter-name>Spring OpenEntityManagerInViewFilter</filter-name>
        <url-pattern>/*</url-pattern>
        <dispatcher>REQUEST</dispatcher>
        <dispatcher>ASYNC</dispatcher>
    </filter-mapping>

</web-app>
如果使用 Servlet 3,Java 基础配置(如使用 WebApplicationInitializer)等,除了需要在 'web.xml 配置 ASYNC 转发类型,你还需要设置 "asyncSupported" 标识。如果想简化这些配置的,可以继承 AbstractDispatcherServletInitializer或AbstractAnnotationConfigDispatcherServletInitializer,这两个抽象类或设置以上标识,如此便可轻松地注册 Filter 实例。
MVC Java 配置和 MVC 命名空间都提供了异步请求处理配置的选项。WebMvcConfigurer 可以通过 configureAsyncSupport 方法设置,<mvc:annotation-driven>则可通过子元件 <async-support> 设置。
如果没有配置异步请求超时时间,以上两种配置都会使用默认的超时时间值(取决于底层 Servlet 容器,如 Tomcat 是 10 秒)。也可以配置 AsyncTaskExecutor,用来执行控制器方法返回的 Callable 实例。另外,强烈推荐你配置 AsyncTaskExecutor 属性,因为 Spring MVC 默认是使用 SimpleAsyncTaskExecutor。MVC Java 配置和 MVC 命名空间都允许注册 CallableProcessingInterceptor和DeferredResultProcessingInterceptor实例。
如果需要覆盖指定 DeferredResult 的默认超时值,可以使用其合适的构造器。类似地,如果是覆盖 Callable 的默认超时值,可以将其封装为 WebAsyncTask 对象并使用合适的构造器来自定义超时值。WebAsyncTask 构造器也提供了 AsyncTaskExecutor。
spring-test 模块提供了一流的测试类,支持测试注解控制器。详情可查看Section 10.15.6, “Spring MVC Test Framework”.
Spring 的前几个版本,开发者都需要在 web 应用的上下文定义(多个) HandlerMapping bean,用来将 web 请求映射到指定的 handler。可当引入注解控制器时,开发者基本不再需要这样配置。因为 RequestMappingHandlerMapping 会自动寻找所有 @Controller bean 中的 @RequestMapping 注解。另外提醒一下,所有从 AbstractHandlerMapping 继承过来的 HandlerMapping 类,都以通过设置以下属性来自定义其行为:
-
interceptors拦截器链。HandlerInterceptors 会在 Section 16.4.1, “使用 HandlerInterceptor 拦截请求” 谈论。 -
defaultHandler默认 handler。此 handler 不影响其他 handler 的使用。 -
orderorder 属性 (可查看org.springframework.core.Ordered接口), Spring会对可匹配的 handler 进行排序,并应用第一个匹配到 handler。 -
alwaysUseFullPath当此属性为true时,Spring 会使用当前 Servlet 上下文的全路径去寻找合适的 handler。当为false时(默认值),Spring 会使用相对路径来寻找合适的 handler。举个例子,当 某个 Servlet 映射/testing/*请求时,若alwaysUseFullPath属性为true,会使用/testing/viewPage.html;反之,使用/viewPage.html。 -
urlDecode从 Spring 2.5 开始,此属性默认为true。如果你更需要编码路基路径,可将此属性设置为 true。然而,HttpServletRequest总会暴露解码后的 Servlet 路径。另外注意的是,当比较编码后的路径时,Servlet 路径是不会再匹配的。
如下例子,演示了如何配置一个拦截器:
<beans>
    <bean id="handlerMapping" class="org.springframework.web.servlet.mvc.method.annotation.RequestMappingHandlerMapping">
        <property name="interceptors">
            <bean class="example.MyInterceptor"/>
        </property>
    </bean>
<beans>
Spring 的 handler 映射机制包含了 handler 拦截器。使用handler 拦截器,可以在某些的请求中应用的特殊的功能,比如说,检查权限。
handler 映射的拦截器必须实现 HandlerInterceptor 接口(此节接口位于 org.springframework
.web.servlet 包中)。这个接口定义了三个方法:preHandle(..) 在 handler
执行前调用;postHandle(..) 在handler 执行后调用;afterCompletion(..)
在整一个请求完成后调用。这三个方法基本足够应对各种预处理和后处理的状况。
preHandle(..) 方法返回一个 boolean 值。你可以使用这个方法来中断或继续处理 handler
执行链。当此方法返回 true 时,hadler 执行链会继续执行;反之,DispatcherServlet
会认为此拦截器已处理完成该请求(和渲染一个视图),之后不再执行余下的拦截器,也不在执行
handler 执行链。
可以使用 interceptors 属性配置拦截器。所有从 AbstractHandlerMapping 继承过来的 HandlerMapping 类都拥有此属性。演示例子如下:
<beans>
    <bean id="handlerMapping"
            class="org.springframework.web.servlet.mvc.method.annotation.RequestMappingHandlerMapping">
        <property name="interceptors">
            <list>
                <ref bean="officeHoursInterceptor"/>
            </list>
        </property>
    </bean>

    <bean id="officeHoursInterceptor"
            class="samples.TimeBasedAccessInterceptor">
        <property name="openingTime" value="9"/>
        <property name="closingTime" value="18"/>
    </bean>
<beans>
package samples;

public class TimeBasedAccessInterceptor extends HandlerInterceptorAdapter {

    private int openingTime;
    private int closingTime;

    public void setOpeningTime(int openingTime) {
        this.openingTime = openingTime;
    }

    public void setClosingTime(int closingTime) {
        this.closingTime = closingTime;
    }

    public boolean preHandle(HttpServletRequest request, HttpServletResponse response,
            Object handler) throws Exception {
        Calendar cal = Calendar.getInstance();
        int hour = cal.get(HOUR_OF_DAY);
        if (openingTime <= hour && hour < closingTime) {
            return true;
        }
        response.sendRedirect("http://host.com/outsideOfficeHours.html");
        return false;
    }
}
通过这样的配置,所有请求 handler 都会被 TimeBasedAccessInterceptor 拦截。如果当前时间是下班时间,用户会重定向到一个静态页面,换句话说就是,你只能在上班时间访问该网站。
[提示]
当使用 RequestMappingHandlerMapping 时,真实的 handler 是一个HandlerMethod 实例,该实例指定了会被调用的控制器方法。
如你所见,Spring 的适配器类 HandlerInterceptorAdapter,使继承 HandlerInterceptor 接口变得更加简单。
| Tip |
|---|---|
|
在上述例子中,所配置的拦截器会应用到所有带注解的请求处理器。如果需要缩窄拦截器的拦截 url 路径范围,可以使用 MVC 命名空间或 MVC Java 配置,或声明 |
注意,HandlerInterceptor 的 postHandle 方法不一定适用于@ResponseBody和ResponseEntity方法。在这种情况下,HttpMessageConverter 实例会在 postHandle 方法执行之前就将数据写到 response 并提交 response,所以 postHandle 方法不可能再处理 response(如添加一个 Header)。相反,应用程序可以实现 ResponseBodyAdvice ,将其声明为 @ControllerAdvice bean 或将其直接在 RequestMappingHandlerAdapter 中配置它。
所有 web 应用的 MVC 框架都会提了视图解析的方案,Spring 提供的视图解析,可以让你在不指定特定视图技术的前提下,便可在浏览器中渲染模型。Spring 支持使用 USP,Veloctiy 模板和 XSLT 视图技术,这些视图技术都是开箱即用的。查看Chapter 17, 视图技术,可以了解到如何集成和使用多种不同的视图技术。
ViewResolver 和 View 是 Spring 处理视图的两个重要接口。当中,ViewResolver 提供了视图名称和真实视图之间的映射,View 则是负责解决某个视图的技术的请求预处理和请求的后续处理。
如 Section 16.3, “Implementing Controllers” 所述,Spring web MVC 中的所有 handler 方法都需要解析某一个逻辑视图名称,可以是显式的,如如返回 String, View, 或 ModelAndView 实例,也可以是隐式的(这个需基于事先约定)。Spring 中视图通过逻辑视图名称来定位,并使用视图解析器解析。Spring 提供了一系列的视图解析其,如下表:
Table 16.3. 视图解析器
| 视图解析器 | 描述 |
|---|---|
| 抽象视图解析器用于缓存视图。通常,在视图使用之前,都需要经过预处理;继承此解析器可用来缓存视图。 |
|
|
|
|
|
|
| Convenient subclass of |
|
|
|
|
举个例子,解析 JSP 视图技术,可以使用 UrlBasedViewResolver 解析器。此解析器会将视图名称转换为 url,和传递请求到 RequestDispatcher,以便渲染视图。
<bean id="viewResolver"
        class="org.springframework.web.servlet.view.UrlBasedViewResolver">
    <property name="viewClass" value="org.springframework.web.servlet.view.JstlView"/>
    <property name="prefix" value="/WEB-INF/jsp/"/>
    <property name="suffix" value=".jsp"/>
</bean>
当返回 test 逻辑逻辑视图名时,此视图解析器会将请求转发到 RequestDispatcher,接着 RequestDispatcher 将请求发送到 /WEB-INF/jsp/test.jsp。
当你需要在 web 应用中联合使用不同的视图技术时,可以使用 ResourceBundleViewResolver 解析器。
<bean id="viewResolver"
        class="org.springframework.web.servlet.view.ResourceBundleViewResolver">
    <property name="basename" value="views"/>
    <property name="defaultParentView" value="parentView"/>
</bean>
The ResourceBundleViewResolver inspects the ResourceBundle identified by the
basename, and for each view it is supposed to resolve, it uses the value of the property
[viewname].(class) as the view class and the value of the property [viewname].url as
the view url. Examples can be found in the next chapter which covers view technologies.
As you can see, you can identify a parent view, from which all views in the properties
file "extend". This way you can specify a default view class, for example.
| Note |
|---|---|
|
|
Spring 提供多种视图技术。因此,你可以定义解析器链,比如,可在某些情况下覆盖指定视图。可通过在应用上下文中添加多个解析器来定义解析器链,如有需要的,也可指定这些解析器的顺序。记住,order 属性越高,解析器的链上位置约靠后。
如下例子,定义了包含两个解析器的解析器链。当中一个是 InternalResourceViewResolver,此解析器总是自动定位到解析器链中最后一个;另外一个是 XmlViewResolver,用来指定 Excel 视图。InternalResourceViewResolver 不支持 Excel 视图。
<bean id="jspViewResolver" class="org.springframework.web.servlet.view.InternalResourceViewResolver">
    <property name="viewClass" value="org.springframework.web.servlet.view.JstlView"/>
    <property name="prefix" value="/WEB-INF/jsp/"/>
    <property name="suffix" value=".jsp"/>
</bean>

<bean id="excelViewResolver" class="org.springframework.web.servlet.view.XmlViewResolver">
    <property name="order" value="1"/>
    <property name="location" value="/WEB-INF/views.xml"/>
</bean>

<!-- in views.xml -->

<beans>
    <bean name="report" class="org.springframework.example.ReportExcelView"/>
</beans>
如果一个视图解析器不能导出一个视图,Spring 会检索上下文,查找其他视图解析器。如果查找到其他视图解析器,Spring 会继续处理,直到有解析器导出一个视图。如果没有解析器返回一个视图,Spring 会抛出 ServletException。
视图解析协议规定视图解析器可以返回 null,表示没有找到指定的视图。然而,不是所有的视图解析器返回null,都表示没有找到视图。因为某些情况下,视图解析器也无法检测视图是否存在。比如,InternalResourceViewResolver 在内部逻辑里使用 RequestDispatcher,如果 JSP 文件存在,那分发是唯一可以找到 JSP 文件的方式,可分发只能执行一次。VelocityViewResolver 和其他解析器也类似。可查看对应视图解析器的 javaDoc 文件,理解其是否报告不存在的视图。
The contract of a view resolver specifies that a view resolver can return null to
indicate the view could not be found. Not all view resolvers do this, however, because
in some cases, the resolver simply cannot detect whether or not the view exists. For
example, the InternalResourceViewResolver uses the RequestDispatcher internally, and
dispatching is the only way to figure out if a JSP exists, but this action can only
execute once. The same holds for the VelocityViewResolver and some others. Check the
javadocs of the specific view resolver to see whether it reports non-existing views.
Thus, putting an InternalResourceViewResolver in the chain in a place other than
the last results in the chain not being fully inspected, because the
InternalResourceViewResolver will always return a view!
如前文所述,控制器通常返回一个逻辑视图名,再由对应视图解析器解析。对于通过 Servlet 或 JSP 引擎来处理的视图技术(如 JSP),其解决方式通常会结合 InternalResourceViewResolver 和 InternalResourceView来处理,使用 Servlet API 的 RequestDispatcher.forward(..) 方法或 RequestDispatcher.include() 方法发出内部跳转或包含的动作。对于其他视图技术(如Velocity, XSLT 等),视图会自身内容直接写到响应流。
在渲染视图前,有时候需要将 HTTP 请求重定向回客户端。比如:当一个控制器处理完 POST 数据,并将响应委托给另一个控制器(如成功提交表单时)。这种情况下,使用正规的内部跳转会让另一个控制器也可检索到 POST 数据,若另一个控制器期待的数据与 POST 数据混淆,则会已发一些潜在的问题。在显示数据前执行重定向的另一个一个原因是:排除用户多次提交表单的可能性。这种情境下,浏览器首先发送初始化好的 POST 请求,接着浏览器接收一个重定向到另一个 URL 的响应,最后,浏览器对后续 URL(上一步响应里的 URL) 执行 GET 请求。因此,从浏览器角度来看,当前页面对应的不是 POST 的结果,而是 GET 的结果。最终的效果就是用户不会因刷新而不小心重新提交一次 POST 数据 —— 刷新是 GET 一次结果的页面,而不是重新发送 POST 数据。
One way to force a redirect as the result of a controller response is for the controller
to create and return an instance of Spring’s RedirectView. In this case,
DispatcherServlet does not use the normal view resolution mechanism. Rather because it
has been given the (redirect) view already, the DispatcherServlet simply instructs the
view to do its work.
The RedirectView issues an HttpServletResponse.sendRedirect() call that returns to
the client browser as an HTTP redirect. By default all model attributes are considered
to be exposed as URI template variables in the redirect URL. Of the remaining attributes
those that are primitive types or collections/arrays of primitive types are
automatically appended as query parameters.
Appending primitive type attributes as query parameters may be the desired result if a
model instance was prepared specifically for the redirect. However, in annotated
controllers the model may contain additional attributes added for rendering purposes
(e.g. drop-down field values). To avoid the possibility of having such attributes appear
in the URL an annotated controller can declare an argument of type RedirectAttributes
and use it to specify the exact attributes to make available to RedirectView. If the
controller method decides to redirect, the content of RedirectAttributes is used.
Otherwise the content of the model is used.
Note that URI template variables from the present request are automatically made
available when expanding a redirect URL and do not need to be added explicitly neither
through Model nor RedirectAttributes. For example:
@RequestMapping(value = "/files/{path}", method = RequestMethod.POST)
public String upload(...) {
    // ...
    return "redirect:files/{path}";
}
If you use RedirectView and the view is created by the controller itself, it is
recommended that you configure the redirect URL to be injected into the controller so
that it is not baked into the controller but configured in the context along with the
view names. The next section discusses this process.
尽管使用 RedirectView 工作正常,可控制器本身创建 RedirectView 这一事实,不可否认其是在执行重定向操作。这是不够理想的,两者之间的关系耦合严重。控制器不应该关心响应如何处理。一般而言,控制器只需操作注入的逻辑的视图名即可。
redirect: 前缀允许你达到上述效果。当逻辑视图名带上 redirect: 前缀时,UrlBasedViewResolver 及其子类会识别该前缀执行重定向操作。视图名的余下部分会将重定向的 url。
redirect: 的作用与控制器返回 RedirectView 的效果一致,不过使用 redirect:,控制器本身只需操作逻辑视图名即可。逻辑视图名(如 redirect:/myapp/some/resource)会相对当前 Servlet 容器重定向,另外如 redirect:http://myhost.com/some/arbitrary/path 的逻辑视图,会根据绝对 url 重定向。
也可在逻辑视图名前使用 forward:,forward: 前缀本质也是由UrlBasedViewResolver及其子类所处理。使用 forward: 前缀,会根据逻辑视图名的余下部分(url)创建InternalResourceView 对象(本质是使用 RequestDispatcher.forward()).
It is also possible to use a special forward: prefix for view names that are
ultimately resolved by UrlBasedViewResolver and subclasses. This creates an
InternalResourceView (which ultimately does a RequestDispatcher.forward()) around
the rest of the view name, which is considered a URL. Therefore, this prefix is not
useful with InternalResourceViewResolver and InternalResourceView (for JSPs for
example). But the prefix can be helpful when you are primarily using another view
technology, but still want to force a forward of a resource to be handled by the
Servlet/JSP engine. (Note that you may also chain multiple view resolvers, instead.)
与 redirect: 前缀类型,当带上 forward: 前缀的视图名注入控制器时,控制器不会察觉将如何处理响应。
ContentNegotiatingViewResolver 自身并没有去解析视图,而是将其委派给其他视图解析器,选择指定响应表述返回给客户端。有以下两种策略,允许客户端请求指定表述方式的资源:
-
不同的资源使用不同的 URI 表示:通常使用文件拓展名来表示不同的响应表述,如
http://www.example.com/users/fred.pdf请求用户 fred 的 pdf 视图表述,http://www.example.com/users/fred.xml则是请求用户 fred 的 xml 视图表述。 -
使用相同的 uri 加载指定资源,不过使用
AcceptHTTP 请求头表示其请求的http://en.wikipedia.org/wiki/Internet_media_type[媒体类型]。如urihttp://www.example.com/users/fred,当Accept为application/pdf,表示请求用户 fred 的pdf视图表述,当Accept为application/xml表示请求用户 fred 的xml 视图表述。这种策略也可称为 内容协商.
[提示]
与 Accept 头字段的有关一个 issue,就在不能通过 web 浏览器设置 Accept 头字段值。比如说,在 firefox,Accept 字段是固定的:
Accept: text/html,application/xhtml+xml,application/xml;q=0.9,*/*;q=0.8
由于这个原因,在开发基于浏览器的web应用时,通常会选择使用不同的uri来表示不同的视图表述.
为了支持同一资源的多种表述,Spring 提供了 ContentNegotiatingViewResolver,可根据文件拓展名或 Accept 头字段值选择指定资源的表述.ContentNegotiatingViewResolver 自身并解释视图,而是将其转发给通过 ViewResolvers 属性配置的视图解析器.
The ContentNegotiatingViewResolver selects an appropriate View to handle the request
by comparing the request media type(s) with the media type (also known as
Content-Type) supported by the View associated with each of its ViewResolvers. The
first View in the list that has a compatible Content-Type returns the representation
to the client. If a compatible view cannot be supplied by the ViewResolver chain, then
the list of views specified through the DefaultViews property will be consulted. This
latter option is appropriate for singleton Views that can render an appropriate
representation of the current resource regardless of the logical view name. The Accept
header may include wild cards, for example text/*, in which case a View whose
Content-Type was text/xml is a compatible match.
为了支持基于文件拓展名的解析,可以使用 ContentNegotiatingViewResolver 的属性 mediaTypes 配置可匹配的媒体类型。关于选择哪一种媒体类型的算法的详细信息,可参考 ContentNegotiatingViewResolver API 文档。
如下,是一个 ContentNegotiatingViewResolver 配置样例:
<bean class="org.springframework.web.servlet.view.ContentNegotiatingViewResolver">
    <property name="mediaTypes">
        <map>
            <entry key="atom" value="application/atom+xml"/>
            <entry key="html" value="text/html"/>
            <entry key="json" value="application/json"/>
        </map>
    </property>
    <property name="viewResolvers">
        <list>
            <bean class="org.springframework.web.servlet.view.BeanNameViewResolver"/>
            <bean class="org.springframework.web.servlet.view.InternalResourceViewResolver">
                <property name="prefix" value="/WEB-INF/jsp/"/>
                <property name="suffix" value=".jsp"/>
            </bean>
        </list>
    </property>
    <property name="defaultViews">
        <list>
            <bean class="org.springframework.web.servlet.view.json.MappingJackson2JsonView" />
        </list>
    </property>
</bean>

<bean id="content" class="com.foo.samples.rest.SampleContentAtomView"/>
InternalResourceViewResolver 处理试图名称的解析和 JSP 页面,另外,BeanNameViewResolver会返回基于 bean 名称的视图(可参考 "使用 ViewResolver 解析视图,了解 Spring 如何寻找和初始化一个视图")。在上述例子中,content bean 是一个继承 AbstractAtomFeedView 的类,这个bean 可以返回一个 RSS 原子。创建 一个原子表述的详细信息,可参考原子视图的那一章。
在上述配置中,当请求是由 .html拓展名组成时,视图解析器会去寻找一个匹配 text/html 的视图。InternalResourceViewResolver 提供了 text/html 的映射。当请求是由 .atom 拓展名组成时,视图解析器会去寻找一个匹配 .atom 的视图。这个视图 BeanNameViewResolver 有提供,若视图名称为 content,则映射到 SampleContentAtomView。当请求是由 .json拓展名组成时,会选择 DefaultViews 提供的 MappingJackson2JsonView 接口,注意这个映射与视图名称无关。另外,客户端的请求不带拓展名,通过 Accept 头字段指定媒体类型时,也会执行和文件拓展名一样的处理逻辑。
| Note |
|---|---|
|
当 |
可以根据 http://localhost/content.atom 或 http://localhost/content和Accept字段值为 application/atom+xml 两种情况,返回原子视图的控制器代码如下:
@Controller
public class ContentController {

    private List<SampleContent> contentList = new ArrayList<SampleContent>();

    @RequestMapping(value="/content", method=RequestMethod.GET)
    public ModelAndView getContent() {
        ModelAndView mav = new ModelAndView();
        mav.setViewName("content");
        mav.addObject("sampleContentList", contentList);
        return mav;
    }

}
Flash attributes provide a way for one request to store attributes intended for use in another. This is most commonly needed when redirecting — for example, the Post/Redirect/Get pattern. Flash attributes are saved temporarily before the redirect (typically in the session) to be made available to the request after the redirect and removed immediately.
Spring MVC has two main abstractions in support of flash attributes. FlashMap is used
to hold flash attributes while FlashMapManager is used to store, retrieve, and manage
FlashMap instances.
Flash attribute support is always "on" and does not need to enabled explicitly although
if not used, it never causes HTTP session creation. On each request there is an "input"
FlashMap with attributes passed from a previous request (if any) and an "output"
FlashMap with attributes to save for a subsequent request. Both FlashMap instances
are accessible from anywhere in Spring MVC through static methods in
RequestContextUtils.
Annotated controllers typically do not need to work with FlashMap directly. Instead an
@RequestMapping method can accept an argument of type RedirectAttributes and use it
to add flash attributes for a redirect scenario. Flash attributes added via
RedirectAttributes are automatically propagated to the "output" FlashMap. Similarly
after the redirect attributes from the "input" FlashMap are automatically added to the
Model of the controller serving the target URL.
Spring MVC 提供了构建和编码 URI 的机制,这种机制的使用需要通过 UriComponentsBuilder 和 UriComponents.
如下,你可以如此展开和编码 URI 模版字符串: For example you can expand and encode a URI template string:
UriComponents uriComponents = UriComponentsBuilder.fromUriString(
        "http://example.com/hotels/{hotel}/bookings/{booking}").build();

URI uri = uriComponents.expand("42", "21").encode().toUri();
注意,UriComponents 是不可变的;如果有需要的,expand() 和 encode() 操作会返回一个新的实例。
Note that UriComponents is immutable and the expand() and encode() operations
return new instances if necessary.
你可以单独使用一个 URI 原件展开和编码 URI 模版字符串:
UriComponents uriComponents = UriComponentsBuilder.newInstance()
        .scheme("http").host("example.com").path("/hotels/{hotel}/bookings/{booking}").build()
        .expand("42", "21")
        .encode();
Servlet 环境中,ServletUriComponentsBuilder 的子类提供了从 Servlet 请求复制 URL 信息的静态方法:
HttpServletRequest request = ...

// 重用 host, scheme, port, path 和 query
// 替换 "accountId" 查询参数

ServletUriComponentsBuilder ucb = ServletUriComponentsBuilder.fromRequest(request)
        .replaceQueryParam("accountId", "{id}").build()
        .expand("123")
        .encode();
另外,你也可以复制上下文和路径信息的某个子集,
// 重用 host,port 和 上下文路径
// 将 "/accounts" 附加到路径中

ServletUriComponentsBuilder ucb = ServletUriComponentsBuilder.fromContextPath(request)
        .path("/accounts").build()
若 DispatcherServlet 是通过名称映射的(如,/main/*),你也可获取到 servlet 映射的文字部分:
// 重用 host,port 和 上下文路径
// 将 Servlet 映射的文字部分附加到路径中
// 将 "/accounts" 附加到路径中

ServletUriComponentsBuilder ucb = ServletUriComponentsBuilder.fromServletMapping(request)
        .path("/accounts").build()
Spring MVC 还提供了另外一种构建和编码 URI 的机制,这种机制可根据应用中对应的控制器和方法来生成 URI。
Spring MVC provides another mechanism for building and encoding URIs that link to
Controllers and methods defined within an application.
MvcUriComponentsBuilder 提供了这种机制,这个类继承了 UriComponentsBuilder。
假设控制器的定义如下:
@Controller
@RequestMapping("/hotels/{hotel}")
public class BookingController {

    @RequestMapping("/bookings/{booking}")
    public String getBooking(@PathVariable Long booking) {

    // ...

}
现在使用 MvcUriComponentsBuilder ,那前面构建的例子可以这样写:
UriComponents uriComponents = MvcUriComponentsBuilder
    .fromMethodName(BookingController.class, "getBooking",21).buildAndExpand(42);

URI uri = uriComponents.encode().toUri();
MvcUriComponentsBuilder 也可以创建 "模拟控制器",相对控制器 API 来说,MvcUriComponentsBuilder可通过代码来创建 URI。
UriComponents uriComponents = MvcUriComponentsBuilder
    .fromMethodCall(on(BookingController.class).getBooking(21)).buildAndExpand(42);

URI uri = uriComponents.encode().toUri();
It is also useful to build links to annotated controllers from views (e.g. JSP).
This can be done through a method on MvcUriComponentsBuilder which refers to mappings
by name called fromMappingName.
As of 4.1 every @RequestMapping is assigned a default name based on the
capital letters of the class and the full method name. For example, the method getFoo in class
FooController is assigned the name "FC#getFoo". This naming strategy is pluggable
by implementing HandlerMethodMappingNamingStrategy and configuring it on your
RequestMappingHandlerMapping. Furthermore the @RequestMapping annotation includes
a name attribute that can be used to override the default strategy.
| Note |
|---|---|
|
指定的请求匹配名称会在启动时以 TRACE 级别输出日志。 |
Spring JSP 标签库提供的 mvcUrl 函数,可以用来准备控制器方法的链接,原理就是基于上述机制。
样例:
@RequestMapping("/people/{id}/addresses")
public class MyController {

    @RequestMapping("/{country}")
    public HttpEntity getAddress(@PathVariable String country) { ... }
}
如下 JSP 代码可以准备一个链接:
<%@ taglib uri="http://www.springframework.org/tags" prefix="s" %>
...
<a href="${s:mvcUrl('PC#getPerson').arg(0,'US').buildAndExpand('123')}">Get Person</a>
Sopring 架构中很大的一部分都支持国际化,Spring web mvc 框架就是其中的一部分。DispatcherServlet 可以根据客户端本地化解析消息。这是通过 LocaleResolver 对象完成的。
当请求到来时,DispatcherServlet 会查找本地化解析器,当找到时,会使用其来设置当前语言环境。通过 RequestContext.getLocale() 方法,你总可以获取到被本地化解析器解析的语言。
除了自动完成本地化解析,对于某些特定情况,你也可以在映射 handler 时添加一个拦截器,动态指定当前语言环境,比如说基于请求中的一个参数。(handler 映射拦截器的详细信息可餐卡 Section 16.4.1, “使用 HandlerInterceptor 拦截请求”)
本地化解析器和拦截器在 org.springframework.web.servlet.i18n 包中定义,都可通过常规方式配置到应用里。这是 Spring 为本地化解析器提供的一种选择。
除了获得客户端的本地化信息,也常常需要获得客户端的时区信息。
LocaleContextResolver 接口拓展了 LocaleResolver,提供一个功能更加丰富的 LocaleContext,当中就包含了时区信息的获取。
在需要的时候,可以通过 RequestContext.getTimeZone() 方法获取用户的时区。时区信息将自动应用 日期/时间转换器和格式化对象(使用 ConversionService 注册)。
AcceptHeaderLocaleResolver 会检查客户端(如 web 浏览器)所发送请求的 accept-language 头字段,通常这个头字段包含了客户端操作系统的本地化信息。__注意,AcceptHeaderLocaleResolver 不支持时区信息的解析。
CookieLocaleResolver 会检查客户端的 Cookie,判断是否存在 Locale 或者 TimeZone 的 cookie。如果存在,会使用 Locale 或者 TimeZone 指定的信息。通过 CookieLocaleResolver 的属性竖着,除了可以指定 cookie 的有效时间,也可以指定的 cookie 的名称。如下,定义了一个 CookieLocaleResolver:
<bean id="localeResolver" class="org.springframework.web.servlet.i18n.CookieLocaleResolver">

    <property name="cookieName" value="clientlanguage"/>

    <!-- in seconds. If set to -1, the cookie is not persisted (deleted when browser shuts down) -->
    <property name="cookieMaxAge" value="100000">

</bean>
Table 16.4. CookieLocaleResolver 属性
| 属性 | 默认值 | 描述 |
|---|---|---|
cookieName | 类名称 + LOCALE | cookie 的名称 |
cookieMaxAge | Integer.MAX_INT | cookie 在客户端的最长有效时间。当为 -1 时,cookie 不会被持久化,在客户端关闭浏览器之后就会失效。 |
cookiePath | / | 限定 cookie 在网站的可见范围。当指定 cookiePath 时,cookie 就只在当前路径或其下路径可见。 |
SessionLocaleResolver 允许你通过 session 检索 Locale 和 TimeZone,此 session 或许与用户的请求有关联。
通过在 handler 映射中添加 LocaleChangeInterceptor 拦截器(可查看Section 16.4, “Handler 映射”),可以修改本地化信息。 LocaleChangeInterceptor 会检测请求里的某一个参数,进而修改本地化信息。它调用了上下文的 LocaleResolver 中的 setLocale() 方法。如下例子,实现了所有包含 siteLanguage 的 *.view 资源,其本地化信息都会被改变。所以,如 http://www.sf.net/home.view?siteLanguage=nl 这个请求,其网站语言会被修改为荷兰语。
<bean id="localeChangeInterceptor"
        class="org.springframework.web.servlet.i18n.LocaleChangeInterceptor">
    <property name="paramName" value="siteLanguage"/>
</bean>

<bean id="localeResolver"
        class="org.springframework.web.servlet.i18n.CookieLocaleResolver"/>

<bean id="urlMapping"
        class="org.springframework.web.servlet.handler.SimpleUrlHandlerMapping">
    <property name="interceptors">
        <list>
            <ref bean="localeChangeInterceptor"/>
        </list>
    </property>
    <property name="mappings">
        <value>/**/*.view=someController</value>
    </property>
</bean>
要在应用中应用视图,必须在应用中建立一个 org.springframework.ui.context.ThemeSource 的实现。WebApplicationContext 接口继承了 ThemeSource,不过其将职责委托给一个专用的实现。默认情况下,委托是一个 org.springframework.ui.context.support.ResourceBundleThemeSource 的实现,其负载从根路径加载各种属性文件。要在应用中使用自定义的 ThemeSource 实现或配置 ResourceBundleThemeSource 名称前缀,你都需要在应用上下文中配置一个名为 themeSource 的 bean,那 web 应用将会自动注入该 bean 并使用它。
当使用 ResourceBundleThemeSource 时,主题会被定义到一个简易的属性文件里。在这个属性文件里会列出组成这个主题的所有资源,如下面这个样例:
styleSheet=/themes/cool/style.css
background=/themes/cool/img/coolBg.jpg
上述属性的 key 就是视图代码中主题元件的名称。在 JSP 里,你可以使用 spring:theme 这个自定义的标签来指向这些主题元件,这个标签的使用类似于 spring:message 标签的使用。如下的 JSP 片段,演示了如何使用上述主题来自定义外观:
<%@ taglib prefix="spring" uri="http://www.springframework.org/tags"%>
<html>
    <head>
        <link rel="stylesheet" href="<spring:theme code='styleSheet'/>" type="text/css"/>
    </head>
    <body style="background=<spring:theme code='background'/>">
        ...
    </body>
</html>
默认情况下,ResourceBundleThemeSource 会使用一个空的名称前缀。因为,属性文件都会从根路径加载。所以你可以在根路径(如/WEB-INF/classes)中放置一个 cool.properties 的主题定义。 ResourceBundleThemeSource 使用标准的 Java 资源束加载机制,允许定义国际化的主题。比如说,我们可以用一个 /WEB-INF/classes/cool_nl.properties 文件指向一张荷兰文的背景图片。
定义好主题后,接着你可以决定使用哪一个主题,DispatcherServlet 将会寻找一个名为 themeResolver 的 bean,从而确定使用哪一个 ThemeResolver 的实现。主题解析器的工作原理类似于 LocaleResolver.它可以为每一个特定的请求准备一个主题,也可以更改请求所使用的主题。如下列出了 Spring 提供的主题解析器:
Table 16.5. ThemeResolver 实现
| Class | 描述 |
|---|---|
| 使用一个固定主题,通过属性 |
| 这个主题维持在用户的 HTTP 会话中。对于每一个会话,都只需要设置一次,不过,其不会在会话中保存。 |
| 所选的主题将会保存到客户端的 cookie 中。 |
Spring 也提供了一个 ThemeChangeInterceptor 拦截器,可根据请求参数动态改变每一个请求的主题。
Spring’s built-in multipart support handles file uploads in web applications. You enable
this multipart support with pluggable MultipartResolver objects, defined in the
org.springframework.web.multipart package. Spring provides one MultipartResolver
implementation for use with Commons
FileUpload and another for use with Servlet 3.0 multipart request parsing.
By default, Spring does no multipart handling, because some developers want to handle
multiparts themselves. You enable Spring multipart handling by adding a multipart
resolver to the web application’s context. Each request is inspected to see if it
contains a multipart. If no multipart is found, the request continues as expected. If a
multipart is found in the request, the MultipartResolver that has been declared in
your context is used. After that, the multipart attribute in your request is treated
like any other attribute.
下面的例子将展示如何使用 CommonsMultipartResolver:
<bean id="multipartResolver"
        class="org.springframework.web.multipart.commons.CommonsMultipartResolver">

    <!-- 其中一个可以配置的属性; 上传文件的最大字节 -->
    <property name="maxUploadSize" value="100000"/>

</bean>
当然,为了multipart resolver 能够正常运行,需要在类路径添加一些jar包.
对于 CommonsMultipartResolver 而言, 你需要使用
commons-fileupload.jar.
当 Spring DispatcherServlet 检测到一个 multi-part 请求时, 就激活在上下文定义的resolver
并移交请求. 然后,resolver 包装当前 HttpServletRequest 成支持multipart文件上传的 MultipartHttpServletRequest.
通过 MultipartHttpServletRequest, 你可以获取当前请求所包含multiparts信息,实际上你也可以在controllers获取多个multipart文件.
为了使用基于Servlet 3.0 的 multipart 解析, 在 web.xml 中, DispatcherServlet 需要用 "multipart-config" 标记,
或者使用 javax.servlet.MultipartConfigElement 以编程的方式注册,
或者在自定义的servlet中使用 javax.servlet.annotation.MultipartConfig注解.
文件上传大小或者存储的地方需要在Servlet注册级别上设置,因为Servlet 3.0不允许这些被 MultipartResolver 设置.
一旦 Servlet 3.0 multipart parsing 已经启用了上述的方式之一,
就可以在Spring配置中添加 StandardServletMultipartResolver:
<bean id="multipartResolver"
        class="org.springframework.web.multipart.support.StandardServletMultipartResolver">
</bean>
在完成添加 MultipartResolver 之后, 这个请求就会和普通请求一样被处理.
首先, 创建一个带上传文件的表单.
设置( enctype="multipart/form-data") 告诉浏览器将表单编码成 multipart request:
<html>
    <head>
        <title>Upload a file please</title>
    </head>
    <body>
        <h1>Please upload a file</h1>
        <form method="post" action="/form" enctype="multipart/form-data">
            <input type="text" name="name"/>
            <input type="file" name="file"/>
            <input type="submit"/>
        </form>
    </body>
</html>
下一步是创建一个 controller 处理上传文件.
需要在请求参数中使用 MultipartHttpServletRequest 或者 MultipartFile, 这个 controller 和
normal annotated @Controller非常相似:
@Controller
public class FileUploadController {

    @RequestMapping(value = "/form", method = RequestMethod.POST)
    public String handleFormUpload(@RequestParam("name") String name,
            @RequestParam("file") MultipartFile file) {

        if (!file.isEmpty()) {
            byte[] bytes = file.getBytes();
            // 将bytes保存
            return "redirect:uploadSuccess";
        }

        return "redirect:uploadFailure";
    }

}
注意 @RequestParam 将方法参数映射输入元素的声明形式.
在这个例子中, 对 byte[] 并没有做什么操作, 但是在实践中你可以保存在数据库, 存储在文件系统, 等等.
当使用 Servlet 3.0 multipart 解析时,你也可以使用 javax.servlet.http.Part 作为方法参数:
@Controller
public class FileUploadController {

    @RequestMapping(value = "/form", method = RequestMethod.POST)
    public String handleFormUpload(@RequestParam("name") String name,
            @RequestParam("file") Part file) {

        InputStream inputStream = file.getInputStream();
        // 将上传的bytes保存

        return "redirect:uploadSuccess";
    }

}
在RESTful service场景中,Multipart requests 可以从一个没有浏览器的客户端提交. 上面的例子和配置同样可以在此适用. 但是, 与通常提交文件和简单表单域的浏览器不同, 一个programmatic clients 还可以发送一个特定内容类型的更复杂的数据, 比如说一个 multipart 请求可以第一部分包含文件第二部分包含 JSON 格式的数据:
POST /someUrl
Content-Type: multipart/mixed

--edt7Tfrdusa7r3lNQc79vXuhIIMlatb7PQg7Vp
Content-Disposition: form-data; name="meta-data"
Content-Type: application/json; charset=UTF-8
Content-Transfer-Encoding: 8bit

{
	"name": "value"
}
--edt7Tfrdusa7r3lNQc79vXuhIIMlatb7PQg7Vp
Content-Disposition: form-data; name="file-data"; filename="file.properties"
Content-Type: text/xml
Content-Transfer-Encoding: 8bit
... File Data ...
你可以通过 @RequestParam("meta-data") String
metadata获取 名字为 "meta-data" 的参数.
但是,你可能更喜欢接收一个从 JSON 格式数据强制转换的对象,
这和 @RequestBody 在 HttpMessageConverter 的协助下在 non-multipart 请求中转换目标对象非常相似.
为了达到这个目的,你可以使用 @RequestPart 注解 代替 @RequestParam 注解.
通过一个 HttpMessageConverter 分析 multipart 的头部 'Content-Type',
可以让你获取 multipart 的特定内容:
@RequestMapping(value="/someUrl", method = RequestMethod.POST)
public String onSubmit(@RequestPart("meta-data") MetaData metadata,
        @RequestPart("file-data") MultipartFile file) {

    // ...

}
注意 MultipartFile 方法参数通过 @RequestParam 或 @RequestPart 的互换方式.
在基于 'Content-Type' 头和 MappingJackson2HttpMessageConverter的情况下
@RequestPart("meta-data") MetaData 方法参数被读取为JSON.
Spring的 HandlerExceptionResolver 用来处理包括controller执行期间在内的异常. 一个 HandlerExceptionResolver 有点类似于 web 应用中定义在 web.xml 中的异常映射.
但是,它们提供了更加灵活的方式.比如说,在抛出异常的时候它提供了一些关于哪个异常处理器将被执行的信息.此外,在请求被转发到另外一个URL之前,编程方式的异常处理提供了更多的处理方式.s
除了实现 HandlerExceptionResolver 接口外, 只需实现 resolveException(Exception, Handler) 方法并且返回一个
ModelAndView, 也可以使用提供的 SimpleMappingExceptionResolver 或者创建一个
@ExceptionHandler 方法. SimpleMappingExceptionResolver 使你能够获取任何异常的类名,这些异常可以被抛出或者映射到一个视图.
这和Servlet API的异常映射特性是等价的,但是它可以通过不同的异常处理器实现更好的异常处理.
另外 @ExceptionHandler 可以被注解在一个处理异常的方法上. 这个方法可以被定义在包含 @Controller 的类局部区域
或者定义在包含 @ControllerAdvice 的类里面应用于多个 @Controller 类. 接下来的章节将会详细的解释.
 `HandlerExceptionResolver` 接口 和 `SimpleMappingExceptionResolver`
实现类允许映射异常到具体的视图,在转发到视图之前可以有Java逻辑代码. 但是, 有些情况下,
尤其是注解 `@ResponseBody` 的方法而不是一个视图的情况下,它可以更方便的直接设置返回的状态和返回的错误内容.
可以通过 @ExceptionHandler 方法. 当它在一个 controller 内部声明时,它将被用于那个controller(或它的子类)的 @RequestMapping 方法抛出的异常.
你也可以在 @ControllerAdvice 类里面声明 @ExceptionHandler 方法,它将会处理很多controller的 @RequestMapping 方法抛出的异常.
下面是作用一个controller域的一个例子
@ExceptionHandler 方法:
@Controller
public class SimpleController {

    // @RequestMapping methods omitted ...

    @ExceptionHandler(IOException.class)
    public ResponseEntity<String> handleIOException(IOException ex) {
        // prepare responseEntity
        return responseEntity;
    }

}
`@ExceptionHandler` 的value可以设置一个需要被处理的异常数组. 如果一个异常被抛出并且包含在这个异常列表中, 然后就会调用 `@ExceptionHandler` 方法. 如果没有设置value,
那么就会使用参数里面的异常.
和标准controller的 @RequestMapping 方法很相似, @ExceptionHandler 方法的参数值和返回值相当灵活.
比如说, HttpServletRequest 可以在 Servlet 环境中被接收,
PortletRequest 在 Portlet 环境中被接收. 返回值可以是 String, 它将解释为一个视图, 可以是 ModelAndView 对象, 可以是 ResponseEntity 对象, 或者你可以添加
@ResponseBody 方法直接返回消息.
Spring MVC may raise a number of exceptions while processing a request. The
SimpleMappingExceptionResolver can easily map any exception to a default error view as
needed. However, when working with clients that interpret responses in an automated way
you will want to set specific status code on the response. Depending on the exception
raised the status code may indicate a client error (4xx) or a server error (5xx).
The DefaultHandlerExceptionResolver translates Spring MVC exceptions to specific error
status codes. It is registered by default with the MVC namespace, the MVC Java config,
and also by the the DispatcherServlet (i.e. when not using the MVC namespace or Java
config). Listed below are some of the exceptions handled by this resolver and the
corresponding status codes:
| Exception | HTTP Status Code |
|---|---|
| 400 (Bad Request) |
| 500 (Internal Server Error) |
| 406 (Not Acceptable) |
| 415 (Unsupported Media Type) |
| 400 (Bad Request) |
| 500 (Internal Server Error) |
| 405 (Method Not Allowed) |
| 400 (Bad Request) |
| 400 (Bad Request) |
| 400 (Bad Request) |
| 404 (Not Found) |
| 404 (Not Found) |
| 400 (Bad Request) |
The DefaultHandlerExceptionResolver works transparently by setting the status of the
response. However, it stops short of writing any error content to the body of the
response while your application may need to add developer-friendly content to every
error response for example when providing a REST API. You can prepare a ModelAndView
and render error content through view resolution — i.e. by configuring a
ContentNegotiatingViewResolver, MappingJackson2JsonView, and so on. However, you may
prefer to use @ExceptionHandler methods instead.
If you prefer to write error content via @ExceptionHandler methods you can extend
ResponseEntityExceptionHandler instead. This is a convenient base for
@ControllerAdvice classes providing an @ExceptionHandler method to handle standard
Spring MVC exceptions and return ResponseEntity. That allows you to customize the
response and write error content with message converters. See the
ResponseEntityExceptionHandler javadocs for more details.
A business exception can be annotated with @ResponseStatus. When the exception is
raised, the ResponseStatusExceptionResolver handles it by setting the status of the
response accordingly. By default the DispatcherServlet registers the
ResponseStatusExceptionResolver and it is available for use.
When the status of the response is set to an error status code and the body of the
response is empty, Servlet containers commonly render an HTML formatted error page. To
customize the default error page of the container, you can declare an <error-page>
element in web.xml. Up until Servlet 3, that element had to be mapped to a specific
status code or exception type. Starting with Servlet 3 an error page does not need to be
mapped, which effectively means the specified location customizes the default Servlet
container error page.
<error-page>
    <location>/error</location>
</error-page>
Note that the actual location for the error page can be a JSP page or some other URL
within the container including one handled through an @Controller method:
When writing error information, the status code and the error message set on the
HttpServletResponse can be accessed through request attributes in a controller:
@Controller
public class ErrorController {

    @RequestMapping(value="/error", produces="application/json")
    @ResponseBody
    public Map<String, Object> handle(HttpServletRequest request) {

        Map<String, Object> map = new HashMap<String, Object>();
        map.put("status", request.getAttribute("javax.servlet.error.status_code"));
        map.put("reason", request.getAttribute("javax.servlet.error.message"));

        return map;
    }

}
or in a JSP:
<%@ page contentType="application/json" pageEncoding="UTF-8"%>
{
    status:<%=request.getAttribute("javax.servlet.error.status_code") %>,
    reason:<%=request.getAttribute("javax.servlet.error.message") %>
}
The Spring Security project provides features
to protect web applications from malicious exploits. Check out the reference documentation in the sections on
"CSRF protection",
"Security Response Headers", and also
"Spring MVC Integration".
Note that using Spring Security to secure the application is not necessarily required for all features.
For example CSRF protection can be added simply by adding the CsrfFilter and
CsrfRequestDataValueProcessor to your configuration. See the
Spring MVC Showcase
for an example.
Another option is to use a framework dedicated to Web Security. HDIV is one such framework and integrates with Spring MVC.
For a lot of projects, sticking to established conventions and having reasonable
defaults is just what they (the projects) need, and Spring Web MVC now has explicit
support for convention over configuration. What this means is that if you establish
a set of naming conventions and suchlike, you can substantially cut down on the
amount of configuration that is required to set up handler mappings, view resolvers,
ModelAndView instances, etc. This is a great boon with regards to rapid prototyping,
and can also lend a degree of (always good-to-have) consistency across a codebase should
you choose to move forward with it into production.
Convention-over-configuration support addresses the three core areas of MVC: models, views, and controllers.
The ControllerClassNameHandlerMapping class is a HandlerMapping implementation that
uses a convention to determine the mapping between request URLs and the Controller
instances that are to handle those requests.
Consider the following simple Controller implementation. Take special notice of the
name of the class.
public class ViewShoppingCartController implements Controller {

    public ModelAndView handleRequest(HttpServletRequest request, HttpServletResponse response) {
        // the implementation is not hugely important for this example...
    }

}
Here is a snippet from the corresponding Spring Web MVC configuration file:
<bean class="org.springframework.web.servlet.mvc.support.ControllerClassNameHandlerMapping"/>

<bean id="viewShoppingCart" class="x.y.z.ViewShoppingCartController">
    <!-- inject dependencies as required... -->
</bean>
The ControllerClassNameHandlerMapping finds all of the various handler (or
Controller) beans defined in its application context and strips Controller off the
name to define its handler mappings. Thus, ViewShoppingCartController maps to the
/viewshoppingcart* request URL.
Let’s look at some more examples so that the central idea becomes immediately familiar.
(Notice all lowercase in the URLs, in contrast to camel-cased Controller class names.)
-
WelcomeControllermaps to the/welcome*request URL -
HomeControllermaps to the/home*request URL -
IndexControllermaps to the/index*request URL -
RegisterControllermaps to the/register*request URL
In the case of MultiActionController handler classes, the mappings generated are
slightly more complex. The Controller names in the following examples are assumed to
be MultiActionController implementations:
-
AdminControllermaps to the/admin/*request URL -
CatalogControllermaps to the/catalog/*request URL
If you follow the convention of naming your Controller implementations as
xxxController, the ControllerClassNameHandlerMapping saves you the tedium of
defining and maintaining a potentially looooong SimpleUrlHandlerMapping (or
suchlike).
The ControllerClassNameHandlerMapping class extends the AbstractHandlerMapping base
class so you can define HandlerInterceptor instances and everything else just as you
would with many other HandlerMapping implementations.
ModelMap 类本质上是一个好听一点的 Map,它坚持一个通用的命名约定,把用于显示在 View 上面的对象添加到其中。考虑下面的 Controller 实现;注意添加到 ModelAndView 中的对象没有指定任意关联的名称。
    public class DisplayShoppingCartController implements Controller {

    public ModelAndView handleRequest(HttpServletRequest request, HttpServletResponse response) {

        List cartItems = // get a List of CartItem objects
        User user = // get the User doing the shopping

        ModelAndView mav = new ModelAndView("displayShoppingCart"); <-- the logical view name

        mav.addObject(cartItems); <-- look ma, no name, just the object
        mav.addObject(user); <-- and again ma!

        return mav;
    }
}
ModelAndView 类使用了一个 ModelMap 类,ModelMap 是一个自定义的 Map 实现,它会为添加到其中的对象自动生成一个 key。决定被添加对象名称的策略是,如果是一个 scalar 对象,会使用对象类的简短类名。对于将 scalar 对象添加到 ModelMap 实例的情况,下面的例子展示了生成的名称:
-
添加的
x.y.User实例会生成名称user。 -
添加的
x.y.Registration会生成名称registration。 -
添加的
x.y.Foo实例会生成名称foo。 -
添加的
java.util.HashMap实例会生成名称hashMap。在这种情况下,你可能想要显式指定名称,因为hashMap不够直观。 -
添加
null会导致抛出一个IllegalArgumentException。如果你要添加的一个对象(或多个对象)为null,那么你也想要显式指定名称。
在添加一个 Set 或 List 之后,生成名称的策略是,使用集合中第一个对象的简短类名,并在名称后追加 List。对数组使用的也是该策略。下面的例子会让你对集合的名称生成的语义更加清楚:
-
添加一个具有零个或多个
x.y.User元素的x.y.User[]数组,会生成名称userList。 -
添加一个具有零个或多个
x.y.User元素的x.y.Foo[]数组,会生成名称fooList。 -
添加一个具有零个或多个
x.y.User元素的java.util.ArrayList,会生成名称userList。 -
添加一个具有零个或多个
x.y.Foo元素的java.util.HashSet,会生成名称fooList。 -
根本不能添加一个空的
java.util.ArrayList(实际上,addObject(..)调用基本上会是一个无效操作)。
The RequestToViewNameTranslator interface determines a logical View name when no
such logical view name is explicitly supplied. It has just one implementation, the
DefaultRequestToViewNameTranslator class.
The DefaultRequestToViewNameTranslator maps request URLs to logical view names, as
with this example:
public class RegistrationController implements Controller {

    public ModelAndView handleRequest(HttpServletRequest request, HttpServletResponse response) {
        // process the request...
        ModelAndView mav = new ModelAndView();
        // add data as necessary to the model...
        return mav;
        // notice that no View or logical view name has been set
    }

}
<?xml version="1.0" encoding="UTF-8"?>
<beans xmlns="http://www.springframework.org/schema/beans"
    xmlns:xsi="http://www.w3.org/2001/XMLSchema-instance"
    xsi:schemaLocation="
        http://www.springframework.org/schema/beans
        http://www.springframework.org/schema/beans/spring-beans.xsd">

    <!-- this bean with the well known name generates view names for us -->
    <bean id="viewNameTranslator"
            class="org.springframework.web.servlet.view.DefaultRequestToViewNameTranslator"/>

    <bean class="x.y.RegistrationController">
        <!-- inject dependencies as necessary -->
    </bean>

    <!-- maps request URLs to Controller names -->
    <bean class="org.springframework.web.servlet.mvc.support.ControllerClassNameHandlerMapping"/>

    <bean id="viewResolver" class="org.springframework.web.servlet.view.InternalResourceViewResolver">
        <property name="prefix" value="/WEB-INF/jsp/"/>
        <property name="suffix" value=".jsp"/>
    </bean>

</beans>
Notice how in the implementation of the handleRequest(..) method no View or logical
view name is ever set on the ModelAndView that is returned. The
DefaultRequestToViewNameTranslator is tasked with generating a logical view name
from the URL of the request. In the case of the above RegistrationController, which is
used in conjunction with the ControllerClassNameHandlerMapping, a request URL of
http://localhost/registration.html results in a logical view name of registration
being generated by the DefaultRequestToViewNameTranslator. This logical view name is
then resolved into the /WEB-INF/jsp/registration.jsp view by the
InternalResourceViewResolver bean.
| Tip |
|---|---|
|
You do not need to define a |
Of course, if you need to change the default settings, then you do need to configure
your own DefaultRequestToViewNameTranslator bean explicitly. Consult the comprehensive
DefaultRequestToViewNameTranslator javadocs for details on the various properties
that can be configured.
An ETag (entity tag) is an HTTP response header
returned by an HTTP/1.1 compliant web server used to determine change in content at a
given URL. It can be considered to be the more sophisticated successor to the
Last-Modified header. When a server returns a representation with an ETag header, the
client can use this header in subsequent GETs, in an If-None-Match header. If the
content has not changed, the server returns 304: Not Modified.
Support for ETags is provided by the Servlet filter ShallowEtagHeaderFilter. It is a
plain Servlet Filter, and thus can be used in combination with any web framework. The
ShallowEtagHeaderFilter filter creates so-called shallow ETags (as opposed to deep
ETags, more about that later).The filter caches the content of the rendered JSP (or
other content), generates an MD5 hash over that, and returns that as an ETag header in
the response. The next time a client sends a request for the same resource, it uses that
hash as the If-None-Match value. The filter detects this, renders the view again, and
compares the two hashes. If they are equal, a 304 is returned. This filter will not
save processing power, as the view is still rendered. The only thing it saves is
bandwidth, as the rendered response is not sent back over the wire.
You configure the ShallowEtagHeaderFilter in web.xml:
<filter>
    <filter-name>etagFilter</filter-name>
    <filter-class>org.springframework.web.filter.ShallowEtagHeaderFilter</filter-class>
</filter>

<filter-mapping>
    <filter-name>etagFilter</filter-name>
    <servlet-name>petclinic</servlet-name>
</filter-mapping>
In a Servlet 3.0+ environment, you have the option of configuring the Servlet container
programmatically as an alternative or in combination with a web.xml file. Below is an
example of registering a DispatcherServlet:
import org.springframework.web.WebApplicationInitializer;

public class MyWebApplicationInitializer implements WebApplicationInitializer {

    @Override
    public void onStartup(ServletContext container) {
        XmlWebApplicationContext appContext = new XmlWebApplicationContext();
        appContext.setConfigLocation("/WEB-INF/spring/dispatcher-config.xml");

        ServletRegistration.Dynamic registration = container.addServlet("dispatcher", new DispatcherServlet(appContext));
        registration.setLoadOnStartup(1);
        registration.addMapping("/");
    }

}
WebApplicationInitializer is an interface provided by Spring MVC that ensures your
implementation is detected and automatically used to initialize any Servlet 3 container.
An abstract base class implementation of WebApplicationInitializer named
AbstractDispatcherServletInitializer makes it even easier to register the
DispatcherServlet by simply overriding methods to specify the servlet mapping and the
location of the DispatcherServlet configuration:
public class MyWebAppInitializer extends AbstractAnnotationConfigDispatcherServletInitializer {

    @Override
    protected Class<?>[] getRootConfigClasses() {
        return null;
    }

    @Override
    protected Class<?>[] getServletConfigClasses() {
        return new Class[] { MyWebConfig.class };
    }

    @Override
    protected String[] getServletMappings() {
        return new String[] { "/" };
    }

}
The above example is for an application that uses Java-based Spring configuration. If
using XML-based Spring configuration, extend directly from
AbstractDispatcherServletInitializer:
public class MyWebAppInitializer extends AbstractDispatcherServletInitializer {

    @Override
    protected WebApplicationContext createRootApplicationContext() {
        return null;
    }

    @Override
    protected WebApplicationContext createServletApplicationContext() {
        XmlWebApplicationContext cxt = new XmlWebApplicationContext();
        cxt.setConfigLocation("/WEB-INF/spring/dispatcher-config.xml");
        return cxt;
    }

    @Override
    protected String[] getServletMappings() {
        return new String[] { "/" };
    }

}
AbstractDispatcherServletInitializer also provides a convenient way to add Filter
instances and have them automatically mapped to the DispatcherServlet:
public class MyWebAppInitializer extends AbstractDispatcherServletInitializer {

    // ...

    @Override
    protected Filter[] getServletFilters() {
        return new Filter[] { new HiddenHttpMethodFilter(), new CharacterEncodingFilter() };
    }

}
Each filter is added with a default name based on its concrete type and automatically
mapped to the DispatcherServlet.
The isAsyncSupported protected method of AbstractDispatcherServletInitializer
provides a single place to enable async support on the DispatcherServlet and all
filters mapped to it. By default this flag is set to true.
Section 16.2.1, “WebApplicationContext 的专用 bean” 和 Section 16.2.2, “默认的 DispatcherServlet 配置” 解释了 Spring MVC 的专用 bean,以及 DispatcherServlet 所使用的默认实现。在本小节中,你将学习配置 Spring MVC 的其他两种方式:MVC Java 配置,以及 MVC XML 命名空间。
MVC Java 配置和 MVC 命名空间均提供了类似的默认配置,以覆盖 DispatcherServlet 的默认值。其目标是使大多数应用程序不必创建相同的配置。另外还为配置 Spring MVC 提供了更高层次的结构,可以作为简易的起点,并且几乎不需要关于底层配置的先行知识。
你可以根据自己的喜好来选用 MVC Java 配置或者 MVC 命名空间。另外,正如你将在下面所看到的,使用 MVC Java 配置会更容易了解底层配置,还能直接对创建的 Spring MVC bean 进行细粒度的自定义。不过我们还是从头开始吧。
要启用 MVC Java 配置,需要在一个 @Configuration 类上添加 @EnableWebMvc 注解:
@Configuration
@EnableWebMvc
public class WebConfig {

}
要在 XML 中达到相同的效果,可以在 DispatcherServlet 上下文中使用 mvc:annotation-driven 元素(如果没有定义 DispatcherServlet 上下文的话,就是在根上下文中):
<?xml version="1.0" encoding="UTF-8"?>
<beans xmlns="http://www.springframework.org/schema/beans"
    xmlns:mvc="http://www.springframework.org/schema/mvc"
    xmlns:xsi="http://www.w3.org/2001/XMLSchema-instance"
    xsi:schemaLocation="
        http://www.springframework.org/schema/beans
        http://www.springframework.org/schema/beans/spring-beans.xsd
        http://www.springframework.org/schema/mvc
        http://www.springframework.org/schema/mvc/spring-mvc.xsd">

    <mvc:annotation-driven />

</beans>
上面的代码注册了 RequestMappingHandlerMapping、RequestMappingHandlerAdapter 以及 ExceptionHandlerExceptionResolver 等等。对于使用了 @RequestMapping、@ExceptionHandler 以及其他等等注解的注解式控制器方法,它们会帮助处理请求。
它同时启用了以下内容:
- Spring 3 风格的类型转换。这是通过 ConversionService 实例,以及用于数据绑定的 JavaBeans PropertyEditor 来实现的。
-
支持使用
@NumberFormat注解 格式化 数值字段。这是通过ConversionService来实现的。 -
支持使用
@DateTimeFormat注解 格式化Date、Calendar、Long和 Joda 时间字段。 -
如果在类路径下存在 JSR-303 供应商的话,则支持使用
@Valid验证@Controller的输入。 -
HttpMessageConverter支持来自@RequestMapping或@ExceptionHandler方法的@RequestBody方法参数和@ResponseBody方法返回值。这是
mvc:annotation-driven设置的 HttpMessageConverter 的完整列表:-
ByteArrayHttpMessageConverter用于转换字节数组。 -
StringHttpMessageConverter用于转换字符串。 -
ResourceHttpMessageConverter用于org.springframework.core.io.Resource和所有媒体类型之间的互相转换。 -
SourceHttpMessageConverter用于数据和javax.xml.transform.Source之间的互相转换。 -
FormHttpMessageConverter用于表单数据和MultiValueMap<String,String>之间的互相转换。 -
Jaxb2RootElementHttpMessageConverter用于 Java 对象与 XML 之间的互相转换 —— 前提类路径下存在 JAXB2 且不存在 Jackson 2 XML 扩展。 -
MappingJackson2HttpMessageConverter用于数据和 JSON 之间的互相转换 —— 前提是在类路径下存在 Jackson 2。 -
MappingJackson2XmlHttpMessageConverterconverts to/from XML — added if Jackson 2 XML extension is present on the classpath. 用于数据和 XML之间的互相转换 —— 前提是类路径下存在 Jackson 2 XML 扩展。 -
AtomFeedHttpMessageConverter用于转换 Atom 源 —— 前提是类路径下存在 Rome。 -
RssChannelHttpMessageConverter用于转换 RSS 源 —— 前提是类路径下存在 Rome。
-
要了解如何进一步定制这些默认的转换器,可以参考???。
| Note |
|---|---|
|
为了提供更好的默认配置,使用了
如果在类路径下检测到了下面这些众所周知的模块,它也会自动地注册它们:
|
To customize the default configuration in Java you simply implement the
WebMvcConfigurer interface or more likely extend the class WebMvcConfigurerAdapter
and override the methods you need. Below is an example of some of the available methods
to override. See
WebMvcConfigurer
for a list of all methods and the javadocs for further details:
@Configuration
@EnableWebMvc
public class WebConfig extends WebMvcConfigurerAdapter {

    @Override
    protected void addFormatters(FormatterRegistry registry) {
        // Add formatters and/or converters
    }

    @Override
    public void configureMessageConverters(List<HttpMessageConverter<?>> converters) {
        // Configure the list of HttpMessageConverters to use
    }

}
To customize the default configuration of <mvc:annotation-driven /> check what
attributes and sub-elements it supports. You can view the
Spring MVC XML schema or use the code
completion feature of your IDE to discover what attributes and sub-elements are
available. The sample below shows a subset of what is available:
<mvc:annotation-driven conversion-service="conversionService">
    <mvc:message-converters>
        <bean class="org.example.MyHttpMessageConverter"/>
        <bean class="org.example.MyOtherHttpMessageConverter"/>
    </mvc:message-converters>
</mvc:annotation-driven>

<bean id="conversionService" class="org.springframework.format.support.FormattingConversionServiceFactoryBean">
    <property name="formatters">
        <list>
            <bean class="org.example.MyFormatter"/>
            <bean class="org.example.MyOtherFormatter"/>
        </list>
    </property>
</bean>
You can configure HandlerInterceptors or WebRequestInterceptors to be applied to all
incoming requests or restricted to specific URL path patterns.
An example of registering interceptors in Java:
@Configuration
@EnableWebMvc
public class WebConfig extends WebMvcConfigurerAdapter {

    @Override
    public void addInterceptors(InterceptorRegistry registry) {
        registry.addInterceptor(new LocaleInterceptor());
        registry.addInterceptor(new ThemeInterceptor()).addPathPatterns("/**").excludePathPatterns("/admin/**");
        registry.addInterceptor(new SecurityInterceptor()).addPathPatterns("/secure/*");
    }

}
And in XML use the <mvc:interceptors> element:
<mvc:interceptors>
    <bean class="org.springframework.web.servlet.i18n.LocaleChangeInterceptor" />
    <mvc:interceptor>
        <mvc:mapping path="/**"/>
        <mvc:exclude-mapping path="/admin/**"/>
        <bean class="org.springframework.web.servlet.theme.ThemeChangeInterceptor" />
    </mvc:interceptor>
    <mvc:interceptor>
        <mvc:mapping path="/secure/*"/>
        <bean class="org.example.SecurityInterceptor" />
    </mvc:interceptor>
</mvc:interceptors>
You can configure how Spring MVC determines the requested media types from the client for request mapping as well as for content negotiation purposes. The available options are to check the file extension in the request URI, the "Accept" header, a request parameter, as well as to fall back on a default content type. By default, file extension in the request URI is checked first and the "Accept" header is checked next.
For file extensions in the request URI, the MVC Java config and the MVC namespace,
automatically register extensions such as .json, .xml, .rss, and .atom if the
corresponding dependencies such as Jackson, JAXB2, or Rome are present on the classpath.
Additional extensions may be not need to be registered explicitly if they can be
discovered via ServletContext.getMimeType(String) or the Java Activation Framework
(see javax.activation.MimetypesFileTypeMap). You can register more extensions with the
setUseRegisteredSuffixPatternMatch
method.
The introduction of ContentNegotiationManager also enables selective suffix pattern
matching for incoming requests. For more details, see its javadocs.
Below is an example of customizing content negotiation options through the MVC Java config:
@Configuration
@EnableWebMvc
public class WebConfig extends WebMvcConfigurerAdapter {

    @Override
    public void configureContentNegotiation(ContentNegotiationConfigurer configurer) {
        configurer.favorPathExtension(false).favorParameter(true);
    }
}
In the MVC namespace, the <mvc:annotation-driven> element has a
content-negotiation-manager attribute, which expects a ContentNegotiationManager
that in turn can be created with a ContentNegotiationManagerFactoryBean:
<mvc:annotation-driven content-negotiation-manager="contentNegotiationManager" />

<bean id="contentNegotiationManager" class="org.springframework.web.accept.ContentNegotiationManagerFactoryBean">
    <property name="favorPathExtension" value="false" />
    <property name="favorParameter" value="true" />
    <property name="mediaTypes" >
        <value>
            json=application/json
            xml=application/xml
        </value>
    </property>
</bean>
If not using the MVC Java config or the MVC namespace, you’ll need to create an instance
of ContentNegotiationManager and use it to configure RequestMappingHandlerMapping
for request mapping purposes, and RequestMappingHandlerAdapter and
ExceptionHandlerExceptionResolver for content negotiation purposes.
Note that ContentNegotiatingViewResolver now can also be configured with a
ContentNegotiatingViewResolver, so you can use one instance throughout Spring MVC.
In more advanced cases, it may be useful to configure multiple
ContentNegotiationManager instances that in turn may contain custom
ContentNegotiationStrategy implementations. For example you could configure
ExceptionHandlerExceptionResolver with a ContentNegotiationManager that always
resolves the requested media type to "application/json". Or you may want to plug a
custom strategy that has some logic to select a default content type (e.g. either XML or
JSON) if no content types were requested.
这是定义一个 ParameterizableViewController 的快捷方式。当调用该控制器时,它会立即转发给一个视图。应该对静态视图使用它:即在视图生成响应之前,Java 控制器没有要执行的逻辑。
下面的例子展示了在 Java 配置方式下,如何将映射到 "/" 的请求转发给名为 "home" 的视图:
@Configuration
@EnableWebMvc
public class WebConfig extends WebMvcConfigurerAdapter {

    @Override
    public void addViewControllers(ViewControllerRegistry registry) {
        registry.addViewController("/").setViewName("home");
    }

}
在 XML 配置方式下则使用 <mvc:view-controller> 元素:
<mvc:view-controller path="/" view-name="home"/>
MVC 配置简化了视图解析器的注册。
下面的代码是一个 Java 配置的示例。它配置了内容协商的视图解决方案,其中使用 FreeMarker HTML 模板和 Jackson 作为默认的 View 来渲染 JSON。
@Configuration
@EnableWebMvc
public class WebConfig extends WebMvcConfigurerAdapter {

    @Override
    public void configureViewResolvers(ViewResolverRegistry registry) {
        registry.enableContentNegotiation(new MappingJackson2JsonView());
        registry.jsp();
    }

}
在 XML 配置中实现相同配置:
<mvc:view-resolvers>
    <mvc:content-negotiation>
        <mvc:default-views>
            <bean class="org.springframework.web.servlet.view.json.MappingJackson2JsonView"/>
        </mvc:default-views>
    </mvc:content-negotiation>
    <mvc:jsp/>
</mvc:view-resolvers>
注意,无论是 FreeMarker、Velocity、Tiles、Groovy Markup 和脚本模板还需要配置底层的视图技术。
MVC 命名空间提供了相应的元素。比如,使用 FreeMarker:
<mvc:view-resolvers>
    <mvc:content-negotiation>
        <mvc:default-views>
            <bean class="org.springframework.web.servlet.view.json.MappingJackson2JsonView"/>
        </mvc:default-views>
    </mvc:content-negotiation>
    <mvc:freemarker cache="false"/>
</mvc:view-resolvers>

<mvc:freemarker-configurer>
    <mvc:template-loader-path location="/freemarker"/>
</mvc:freemarker-configurer>
在 Java 配置方式下,添加一个对应的 "Configurer" bean即可:
@Configuration
@EnableWebMvc
public class WebConfig extends WebMvcConfigurerAdapter {

    @Override
    public void configureViewResolvers(ViewResolverRegistry registry) {
        registry.enableContentNegotiation(new MappingJackson2JsonView());
        registry.freeMarker().cache(false);
    }

    @Bean
    public FreeMarkerConfigurer freeMarkerConfigurer() {
        FreeMarkerConfigurer configurer = new FreeMarkerConfigurer();
        configurer.setTemplateLoaderPath("/WEB-INF/");
        return configurer;
    }

}
该选项允许由 ResourceHttpRequestHandler 来处理遵循特定 URL 模式的静态资源请求,这些请求可以是来自一系列任意的 Resource 路径。它提供了一种处理静态资源的便利方式,静态资源可以处于任意位置(包括类路径下的位置)而不仅仅是 web 应用程序的根路径。cache-period 属性可以用来设置很久以后才到期的 header(比如 Page Speed 和 YSlow 等优化工具建议设置为一年),以便客户端可以更为有效的利用它们。该处理器还会正确计算 Last-Modified header(如果存在的话),因此将返回一个对应的 304 状态码,以避免不必要的客户端缓存资源的开销。例如,将 URL 模式 /resources/** 的资源请求映射到 web 应用程序根路径下的 public-resources 目录,应该使用下列配置:
@Configuration
@EnableWebMvc
public class WebConfig extends WebMvcConfigurerAdapter {

    @Override
    public void addResourceHandlers(ResourceHandlerRegistry registry) {
        registry.addResourceHandler("/resources/**").addResourceLocations("/public-resources/");
    }

}
在 XML 配置中实现相同配置:
<mvc:resources mapping="/resources/**" location="/public-resources/"/>
为了确保最大程度地利用浏览器缓存和减少浏览器发出的 HTTP 请求,可以使这些资源在一年后到期:
@Configuration
@EnableWebMvc
public class WebConfig extends WebMvcConfigurerAdapter {

    @Override
    public void addResourceHandlers(ResourceHandlerRegistry registry) {
        registry.addResourceHandler("/resources/**").addResourceLocations("/public-resources/").setCachePeriod(31556926);
    }

}
XML 配置:
<mvc:resources mapping="/resources/**" location="/public-resources/" cache-period="31556926"/>
查看 ??? 来了解更多细节。
mapping 属性必须符合 Ant 模式,以便 SimpleUrlHandlerMapping 可以使用它,location 属性必须指定一个或多个有效的资源目录路径。可以使用逗号分隔的值列表来指定多个资源路径。对每一个请求,都会根据资源出现的顺序来检查指定的路径。例如,来开启来自 web 应用程序根路径和类路径下任意 jar 中的已知的 /META-INF/public-web-resources/ 路径,使用下列 Java 配置:
@EnableWebMvc
@Configuration
public class WebConfig extends WebMvcConfigurerAdapter {

    @Override
    public void addResourceHandlers(ResourceHandlerRegistry registry) {
        registry.addResourceHandler("/resources/**")
                .addResourceLocations("/", "classpath:/META-INF/public-web-resources/");
    }

}
XML 配置:
<mvc:resources mapping="/resources/**" location="/, classpath:/META-INF/public-web-resources/"/>
资源服务可能会发生变化。当部署了一个新版本的应用程序时,建议你在用于请求资源的映射模式中添加一个版本字符串,以便强制客户请求应用程序资源的新部署版本。框架支持版本化 URL,可以在资源处理器上配置资源链(resource chain)来进行启用。一个或多个 ResourceResolver 实例后可以跟一个或多个 ResourceTransformer 实例,这就组成了资源链。它们在一起可以对资源进行任意的解析和转换。
可以为内建的 VersionResourceResolver 配置不同的策略。例如,FixedVersionStrategy 可以使用一个属性、日期等作为版本。ContentVersionStrategy 使用通过资源内容计算而来的 MD5 哈希值(称为 “指纹” URL)。
使用 ContentVersionStrategy 是一个优秀的默认选择,除非在某些情况下不能使用它(例如,使用了 JavaScript 模块加载器)。针对不同的模式,你可以配置不同的版本策略,如下所示。还要注意的是,基于内容的计算需要一定开销,因此在生产环境下应该启用资源链的缓存。
Java 配置示例:
@Configuration
@EnableWebMvc
public class WebConfig extends WebMvcConfigurerAdapter {

    @Override
    public void addResourceHandlers(ResourceHandlerRegistry registry) {
        registry.addResourceHandler("/resources/**")
                .addResourceLocations("/public-resources/")
                .resourceChain(true).addResolver(
                    new VersionResourceResolver().addContentVersionStrategy("/**"));
    }

}
XML 示例:
<mvc:resources mapping="/resources/**" location="/public-resources/">
	<mvc:resource-chain>
		<mvc:resource-cache />
		<mvc:resolvers>
			<mvc:version-resolver>
				<mvc:content-version-strategy patterns="/**"/>
			</mvc:version-resolver>
		</mvc:resolvers>
	</mvc:resource-chain>
</mvc:resources>
为了使上述配置能够工作,应用程序还必须渲染带有版本的 URL。最简单的方式是配置 ResourceUrlEncodingFilter,它对响应进行包装并重写了其 encodeURL 方法。 包括 JSP、FreeMarker、Velocity,以及其他所有调用了响应的 encodeURL 方法的视图技术,这种方式都能工作。另外,也可以注入 ResourceUrlProvider bean,应用程序会直接使用它。可以使用 MVC Java 配置和 MVC 命名空间来自动声明这个 bean。
WebJarsResourceResolver 也支持 Webjar。如果类路径下存在 "org.webjars:webjars-locator" 库的话,会自动注册 WebJarsResourceResolver。该解析器允许资源链解析未知版本的库,例如 "GET /jquery/jquery.min.js" 这个 HTTP GET 请求会返回 "/jquery/1.2.0/jquery.min.js" 这个资源。该解析器还支持在模板中重写资源 URL,例如 <script src="/jquery/jquery.min.js"/> → <script src="/jquery/1.2.0/jquery.min.js"/>。
支持将 DispatcherServlet 映射到 "/"(即覆盖了容器默认 Servlet 的映射),同时支持将静态资源请求交给容器默认的 Servlet 来处理。它配置了一个将 URL 映射到 "/**" 的 DefaultServletHttpRequestHandler,并且该处理器的优先级相比其他 URL 映射而言是最低的。
如果你使用的是 <mvc:annotation-driven>,或者设置了自定义的 HandlerMapping 实例,你需要确保该处理器的 order 属性的值比 DefaultServletHttpRequestHandler 的 order 属性的值(Integer.MAXVALUE)更小。
使用默认的设置来启用该特性:
@Configuration
@EnableWebMvc
public class WebConfig extends WebMvcConfigurerAdapter {

    @Override
    public void configureDefaultServletHandling(DefaultServletHandlerConfigurer configurer) {
        configurer.enable();
    }

}
或者使用 XML 配置:
<mvc:default-servlet-handler/>
需要注意的是,覆盖了 "/" Servlet 映射后,应该通过名称而非路径来查找默认 Servlet 的 RequestDispatcher。DefaultServletHttpRequestHandler 尝试在启动时自动检测容器默认的 Servlet,这里它使用的大多数主要的 Servlet 容器(包括 Tomcat、GlassFish、JBoss、Resin、Weblogic、和 WebSphere)的一系列已知的名称。如果使用了一个不同的名称来自定义配置默认的 Servlet,或者使用的是一个不同的 Servlet 容器,其默认的 Servlet 名称是未知的,那么必须显式提供默认的 Servlet 名称,如下例所示:
@Configuration
@EnableWebMvc
public class WebConfig extends WebMvcConfigurerAdapter {

    @Override
    public void configureDefaultServletHandling(DefaultServletHandlerConfigurer configurer) {
        configurer.enable("myCustomDefaultServlet");
    }

}
或者使用 XML 配置:
<mvc:default-servlet-handler default-servlet-name="myCustomDefaultServlet"/>
This allows customizing various settings related to URL mapping and path matching. For details on the individual options check out the PathMatchConfigurer API.
Below is an example in Java config:
@Configuration
@EnableWebMvc
public class WebConfig extends WebMvcConfigurerAdapter {

    @Override
    public void configurePathMatch(PathMatchConfigurer configurer) {
        configurer
            .setUseSuffixPatternMatch(true)
            .setUseTrailingSlashMatch(false)
            .setUseRegisteredSuffixPatternMatch(true)
            .setPathMatcher(antPathMatcher())
            .setUrlPathHelper(urlPathHelper());
    }

    @Bean
    public UrlPathHelper urlPathHelper() {
        //...
    }

    @Bean
    public PathMatcher antPathMatcher() {
        //...
    }

}
And the same in XML, use the <mvc:path-matching> element:
<mvc:annotation-driven>
    <mvc:path-matching
        suffix-pattern="true"
        trailing-slash="false"
        registered-suffixes-only="true"
        path-helper="pathHelper"
        path-matcher="pathMatcher" />
</mvc:annotation-driven>

<bean id="pathHelper" class="org.example.app.MyPathHelper" />
<bean id="pathMatcher" class="org.example.app.MyPathMatcher" />
As you can see from the above examples, MVC Java config and the MVC namespace provide higher level constructs that do not require deep knowledge of the underlying beans created for you. Instead it helps you to focus on your application needs. However, at some point you may need more fine-grained control or you may simply wish to understand the underlying configuration.
The first step towards more fine-grained control is to see the underlying beans created
for you. In MVC Java config you can see the javadocs and the @Bean methods in
WebMvcConfigurationSupport. The configuration in this class is automatically imported
through the @EnableWebMvc annotation. In fact if you open @EnableWebMvc you can see
the @Import statement.
The next step towards more fine-grained control is to customize a property on one of the
beans created in WebMvcConfigurationSupport or perhaps to provide your own instance.
This requires two things — remove the @EnableWebMvc annotation in order to prevent
the import and then extend from DelegatingWebMvcConfiguration, a subclass of
WebMvcConfigurationSupport.
Here is an example:
@Configuration
public class WebConfig extends DelegatingWebMvcConfiguration {

    @Override
    public void addInterceptors(InterceptorRegistry registry){
        // ...
    }

    @Override
    @Bean
    public RequestMappingHandlerAdapter requestMappingHandlerAdapter() {
        // Create or let "super" create the adapter
        // Then customize one of its properties
    }

}
| Note |
|---|---|
|
An application should have only one configuration extending Modifying beans in this way does not prevent you from using any of the higher-level
constructs shown earlier in this section. |
Fine-grained control over the configuration created for you is a bit harder with the MVC namespace.
If you do need to do that, rather than replicating the configuration it provides,
consider configuring a BeanPostProcessor that detects the bean you want to customize
by type and then modifying its properties as necessary. For example:
@Component
public class MyPostProcessor implements BeanPostProcessor {

    public Object postProcessBeforeInitialization(Object bean, String name) throws BeansException {
        if (bean instanceof RequestMappingHandlerAdapter) {
            // Modify properties of the adapter
        }
    }

}
Note that MyPostProcessor needs to be included in an <component scan /> in order for
it to be detected or if you prefer you can declare it explicitly with an XML bean
declaration.